by Angie Holden | Nov 23, 2017 | Craft Tutorials
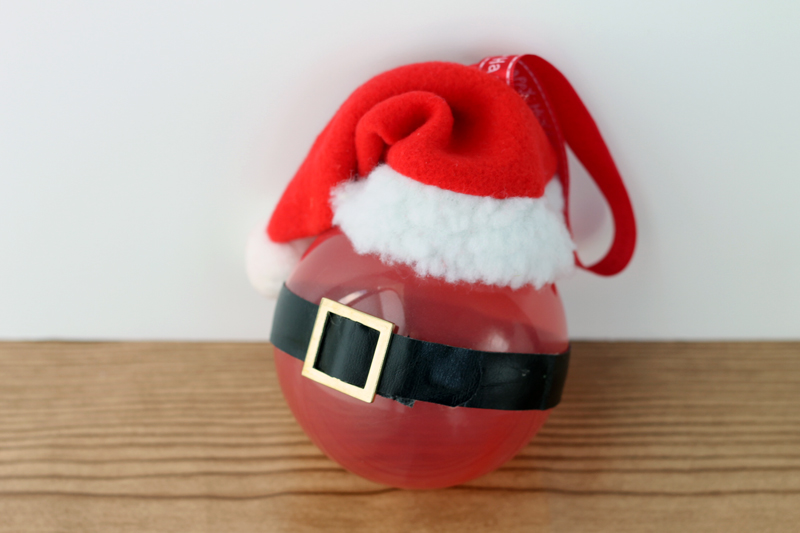
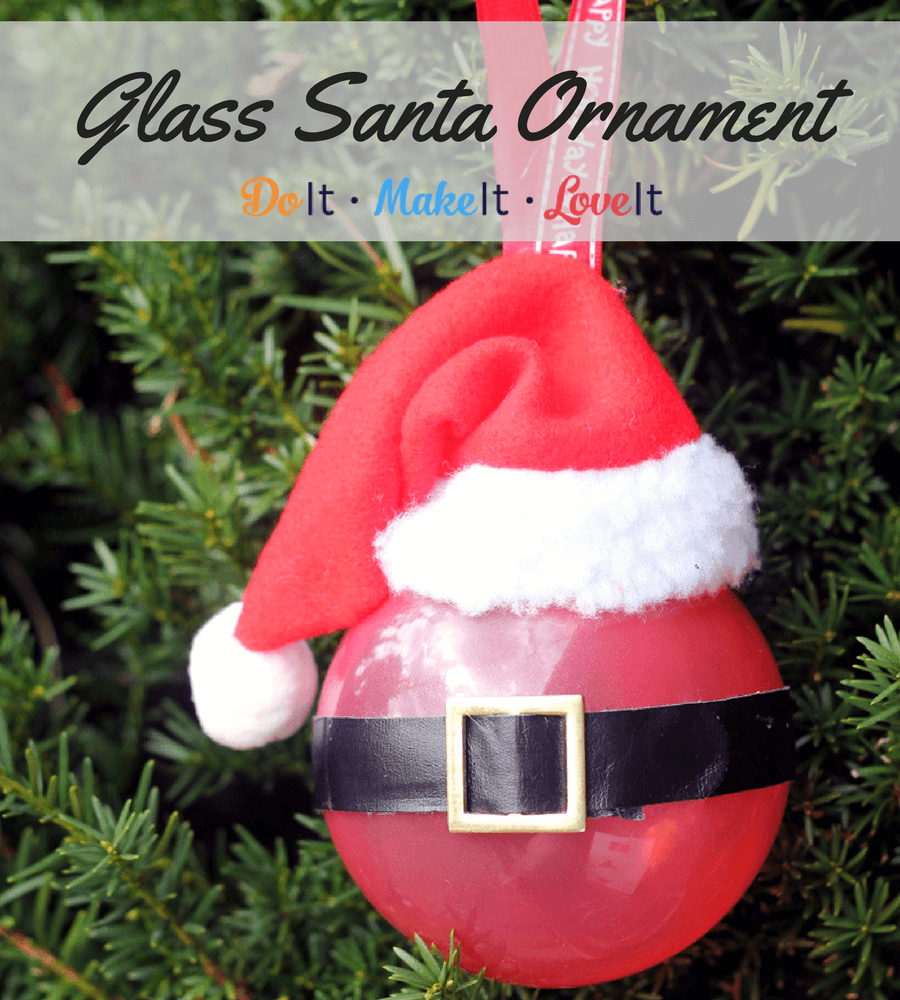
My friend’s daughter is obsessed with Santa. It’s the cutest thing. She just gets so excited about everything Santa Claus that I wanted to make her a simple ornament to remember this year. Of course, it had to be a Santa ornament! I really wanted this one to be special so I decided to go with a glass Santa ornament that can be shared year after year. Want to make your own? Learn how to make this cute glass Santa ornament below!
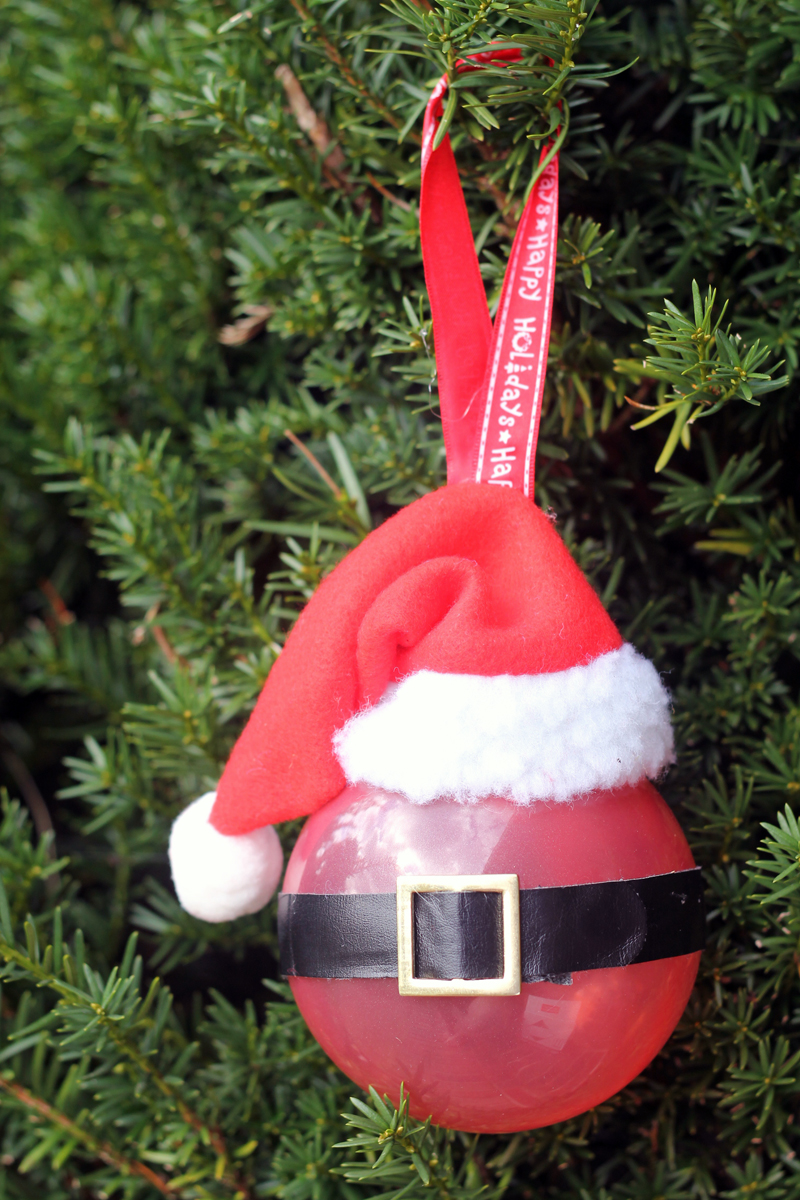
This simple Christmas ornament tutorial is handy to have around because of the glass stain technique! You can even make your own simple colored glass ornaments using this stuff. Since plain glass ornaments are so easy to find nowadays, it’s easy to create your own color scheme with the glass stain. Here I used it for Santa’s belly!
How to Make a Glass Santa Ornament

Supplies:
- glass ornament
- glass stain
- ribbon
- glue
- mini Santa hat
- mini belt
Instructions:
- Pour glass stain into the ornament and swirl around to cover the entire inside. Glass stain will make your ornament slightly translucent. Paint can also be used. Add enough to the inside of the ornament to get complete coverage.
- Turn upside down to dry and support. This way all of the excesses will run out and the ornament will dry faster.
- Carefully replace ornament top
- Glue on hat and belt
- Add ribbon to hang on the tree
My friend loved the Santa ornament for her little girl. This year she had her write down her hopes and wishes for next year and put them inside the ornament on little strips of paper so Santa can sprinkle some magic on her dreams when he stops by to drop off gifts. Cute idea!
We love to see what you made! Share pictures with us on our Facebook page or let us know on Instagram.
by Angie Holden | Nov 20, 2017 | Craft Tutorials
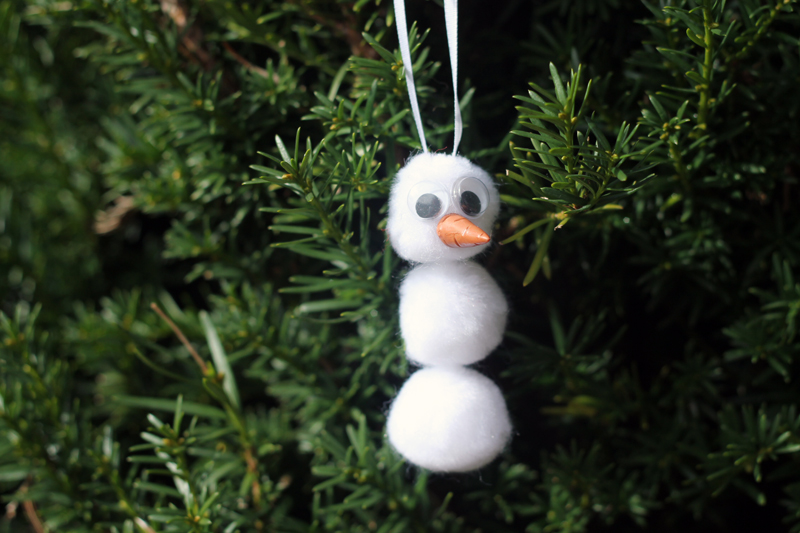
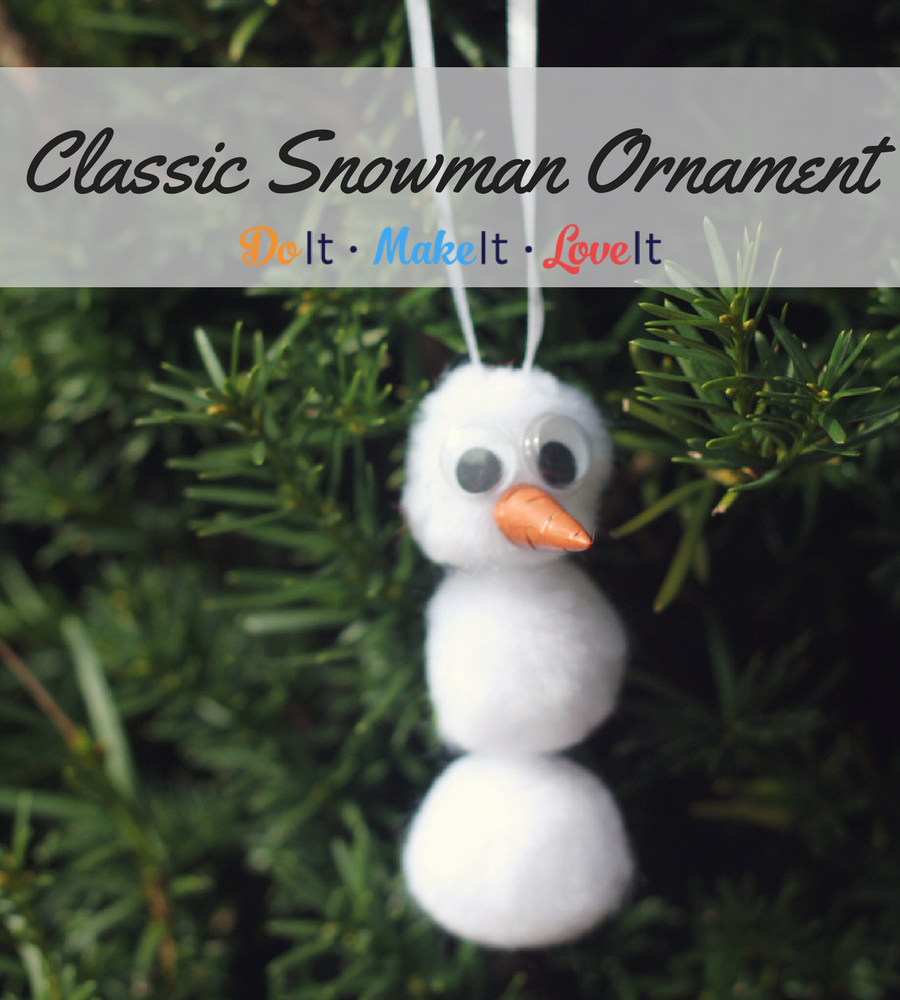
My mom was one of those moms that kept everything I ever made for her. So I fondly remember this little pom pom ornament hanging on the tree for years, long after I had even remembered I made it. She always knew I was destined to be a crafter 😉
This year, I just had to remake my little pom pom snowman to keep the tradition going. It’s such a fun and easy tradition to start with your kids, that I couldn’t pass it up. Making these DIY snowman ornaments is so simple and mostly mess-free, which makes it a great activity to do with the kids while waiting for cookies to finish baking!
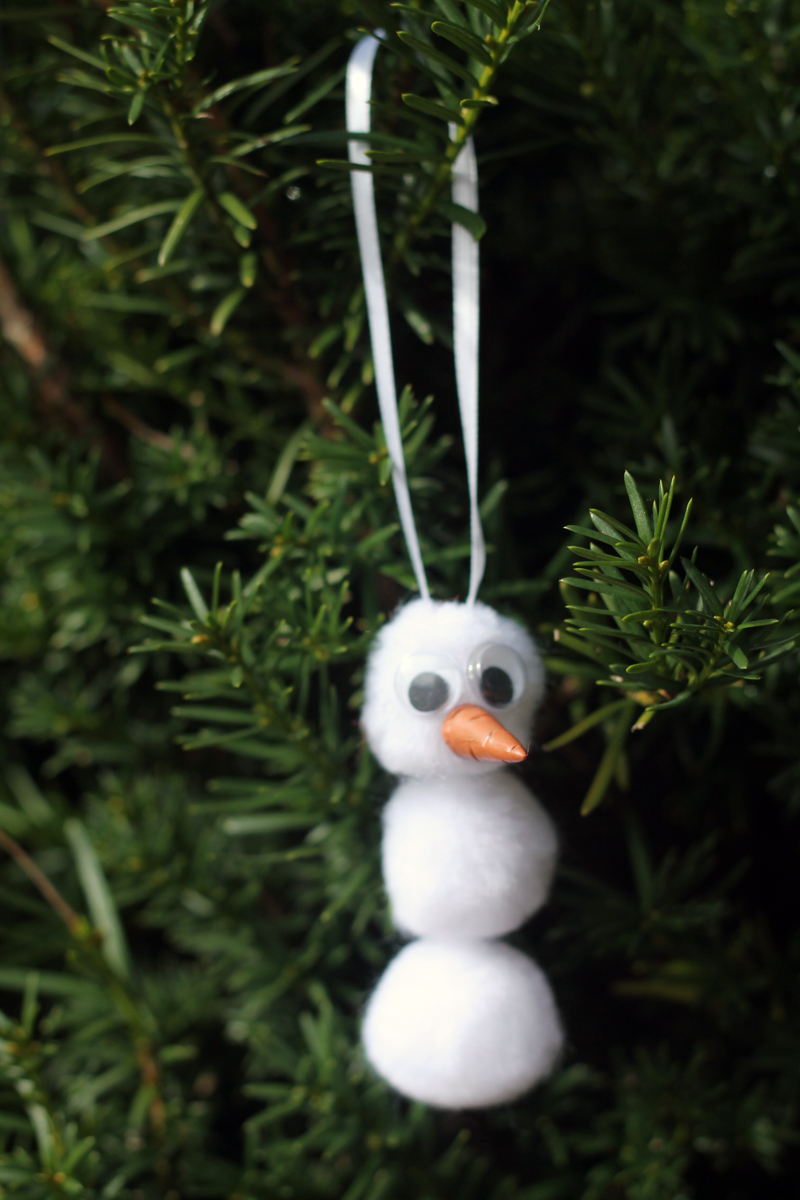
This DIY Christmas ornament is just too cute to pass up. Come on, google eyes?! The kids went crazy for it. Best thing is the supply list is short and cheap. If you can’t find a miniature nose try snipping off a small piece of orange chenille stem and gluing it in place. Works just as well!
DIY Snowman Christmas Ornament
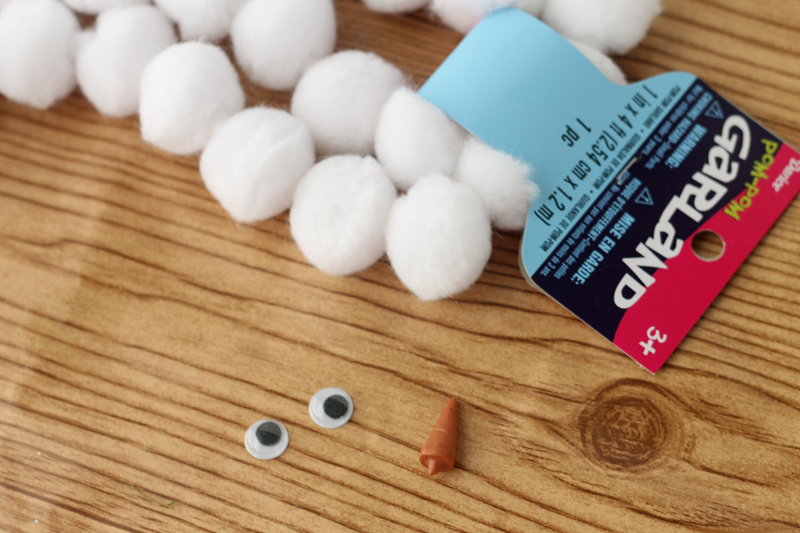
Supplies:
- Pom pom garland
- Ribbon
- Google eyes
- Miniature nose or orange pipe cleaner
- Glue
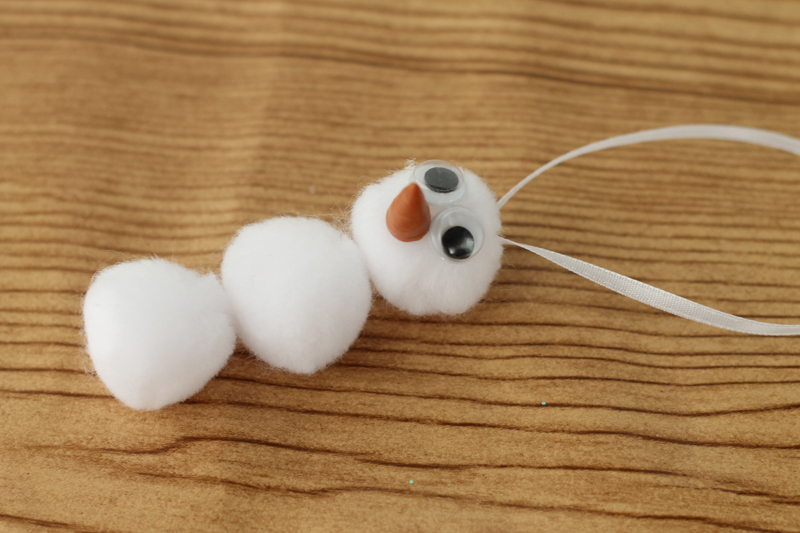
Instructions:
- Cut off a strand of three pom poms.
- Glue on eyes and a miniature nose.
- Add a ribbon to the top to hang.
Simple, right? It’s so simple, in fact, that I think we accidentally ended up making about 40 of them. Whoops. That’s what happens when you buy “extra” craft supplies. So I guarantee your kids will have a blast making these too. If you end making way too many, like I did, try adding them as an added piece of decor to your gifts or turning them into magnets! Just glue one magnet to the back of each pom pom and viola! Now you have every inch of your home decorated for Christmas. Does it get any better?
Do you have any other creative ideas for too many snowmen? Share them with us on our Facebook page or let us know on Instagram.
by Maggie Kmiecik | Nov 13, 2017 | Craft Tutorials
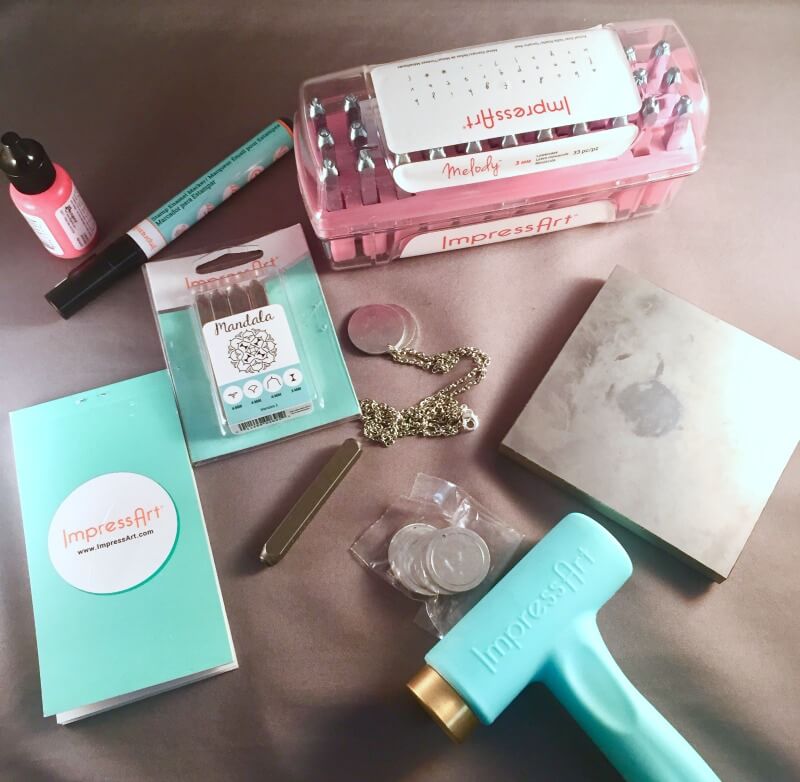
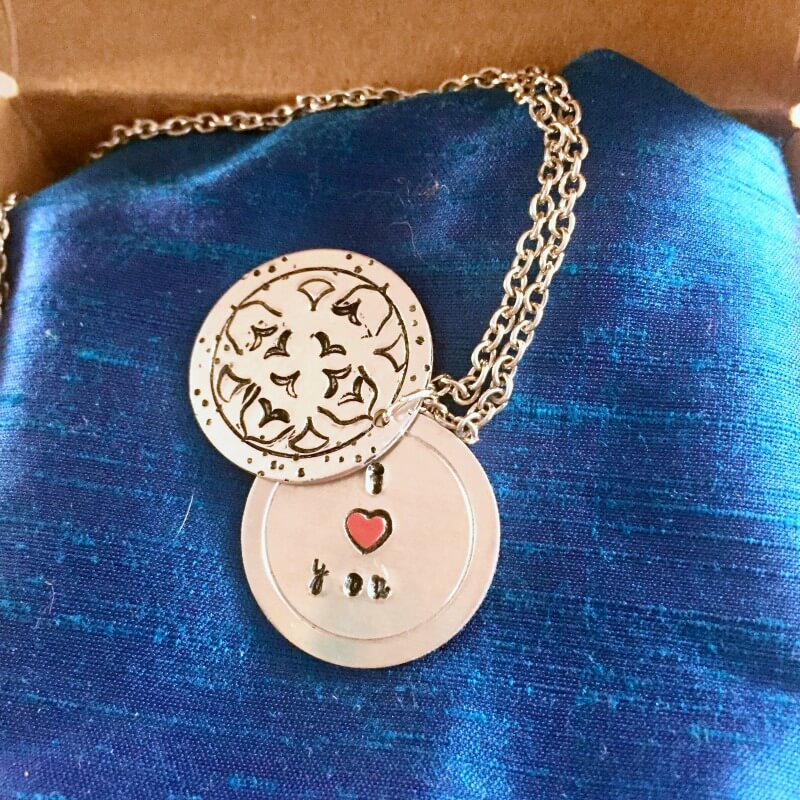
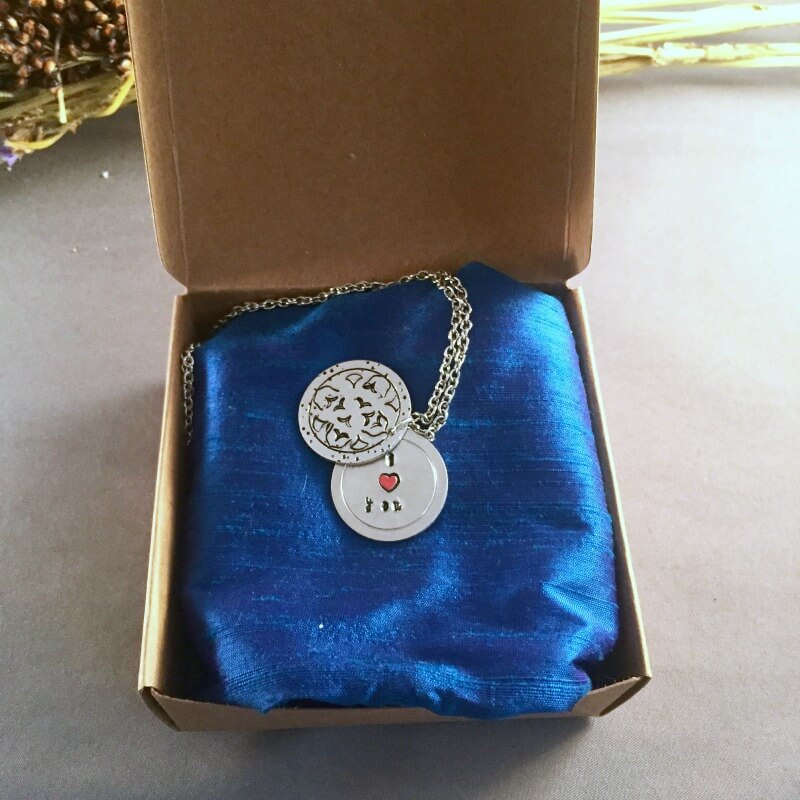
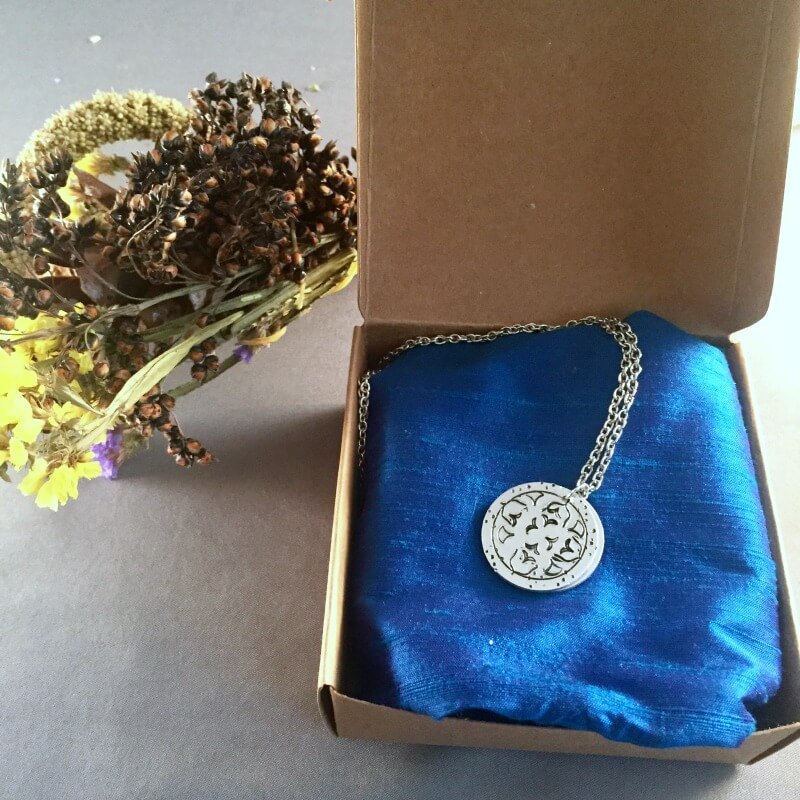
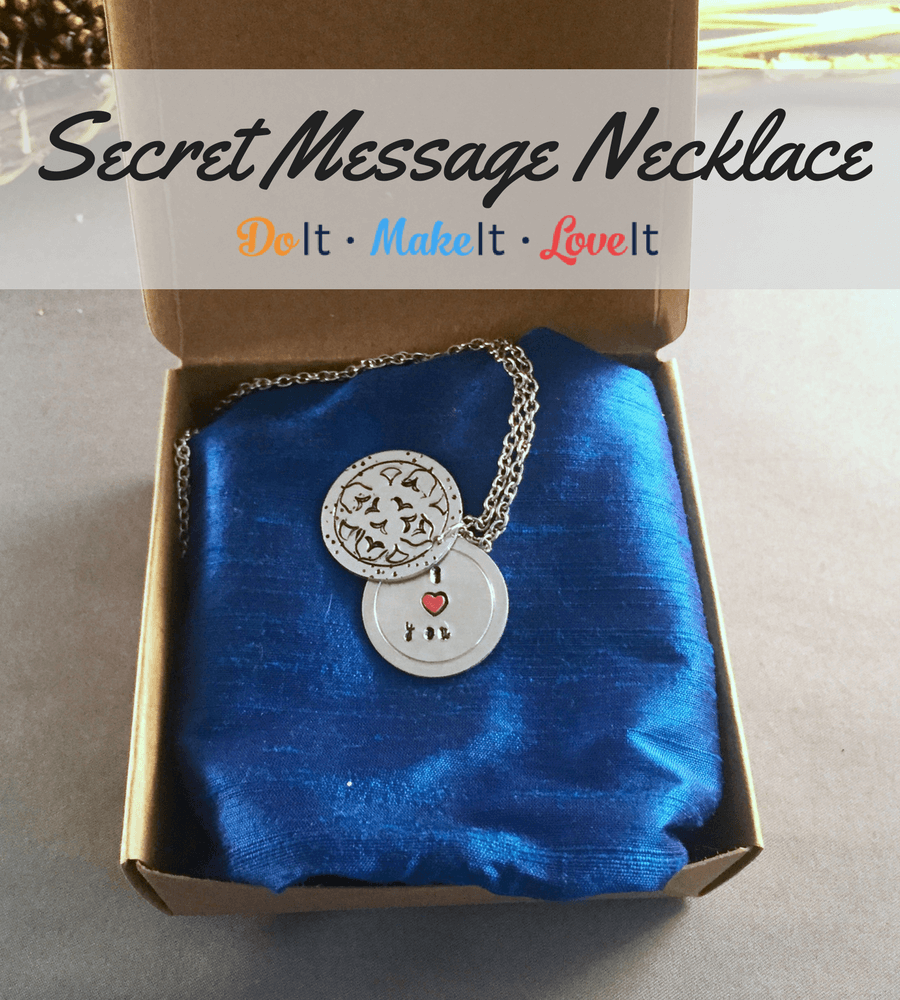
I love simple but meaningful gift ideas. Since I gravitate towards jewelry, I always look for fun jewelry projects that I can turn into easy gift ideas. This hand stamped secret message necklace is just that! This necklace would be pretty on its own, but the secret message makes it an extra special handmade gift that anyone can appreciate. Making this metal stamped necklace is way easier than it looks! Especially, when you have all the right tools.
If you’re a metal stamper, you’re probably pretty familiar with ImpressArt. They are fantastic at understanding what you need for metal stamping and every year they come out with new products that just make stamping so simple. Metal stamping is how I started playing around with metal because it was the easiest thing to do without learning how to be a metalsmith! Not to mention, it’s so fun! Get your aggression out by hammering some metal! It’s the best stress therapy.
I’ve always been a big fan of ImpressArt and their selection of metal stamping tools and accessories. I was so excited to be able to work with some of their newest products to come up with this project. Keep scrolling to learn how to make this metal stamped secret message pendant for yourself or someone extra special!
How to Make a Hand Stamped Secret Message Necklace
Supplies:
The supply list below includes affiliate links. If you purchase your supplies using this link, it won’t cost you extra and we’ll earn a little commission to help support the blog! Check out our disclosure and privacy policy.
Instructions:
- Plan out your design. Think about which stamps you will be using and how you want them to be laid out. Take a few minutes to sketch out your ideas before getting to work. I found that taking an extra minute or two to plan makes a world of difference in your final piece.
- Lay your front circle blank on the stamping block and place one of the circle grid adhesive stickers from the stamp guide onto your piece. These stickers have been life-changing. You can stamp right over them and see your piece while working because they are clear. Highly recommend if you plan on doing a lot of stamping, if not, you can always hand draw a grid with a Sharpie and ruler.

- Begin stamping your mandala pattern on your front piece. I just did a simple pattern and then textured the edges with one of my texturing stamps. Once you’re done, pull off the remaining sticker and set aside.
- Place your second circle blank on the stamping block. If you need a stamping guide, the little book also comes with a sticky ruler so you can align your words! Stamp your message on and set aside.
- Both your front and secret piece should be stamped. Take the stamp enamel marker and cover all of the stamped parts you want to fill in with a black outline. Let them dry for about a minute or two and then rub off the excess ink. Repeat again if the dips aren’t dark enough for you.
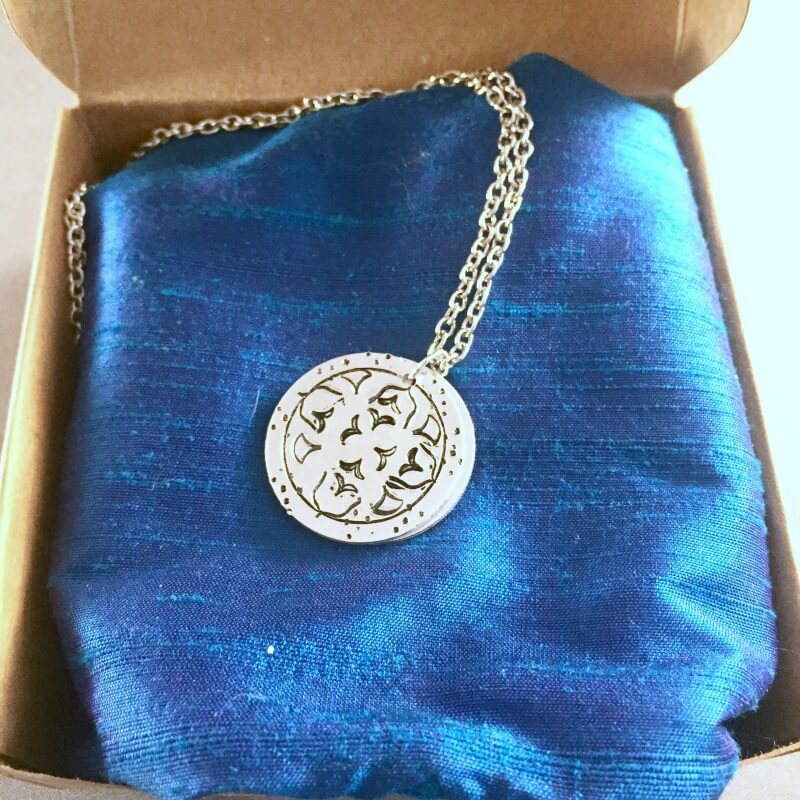
- With the applicator or a small paint brush, apply a tiny drop of red enamel accent to the heart. Carefully spread it to the edges. Let dry for at least an hour.

- When the heart is dry, you’re ready to assemble! Grab your pliers and open one jump ring. Slide the two finished circle blanks on it. Use your pliers to close the jump ring.
- Open another jump ring, slide on one end of your chain and the lobster clasp. Use your pliers to close your jump ring.
- Slide the other end of the chain through the jump ring that is on the circle blanks.
- Open the last jump ring with your pliers, attach it to the empty end of your chain. Close the jump ring.
- Try on your new necklace!
I love this simple project because it makes such a sweet and intimate gift and it only takes a couple hours to put together! This easy DIY necklace makes a great best friend gift or a special surprise for mom. Really, who doesn’t love a special secret message just for them?
Grab your stamps and some blanks and make some cute necklaces this weekend!

Did you make one of these? We love seeing your projects. Share a photo on our Facebook page!
by Angie Holden | Nov 7, 2017 | Craft Tutorials
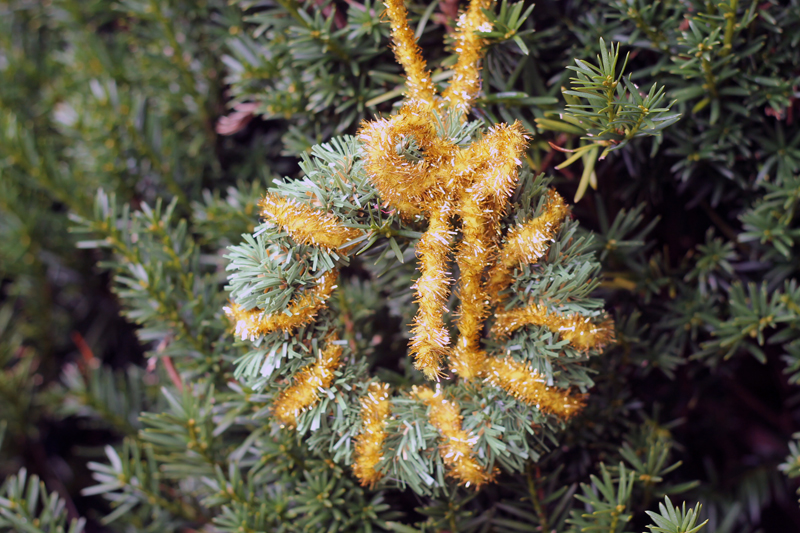
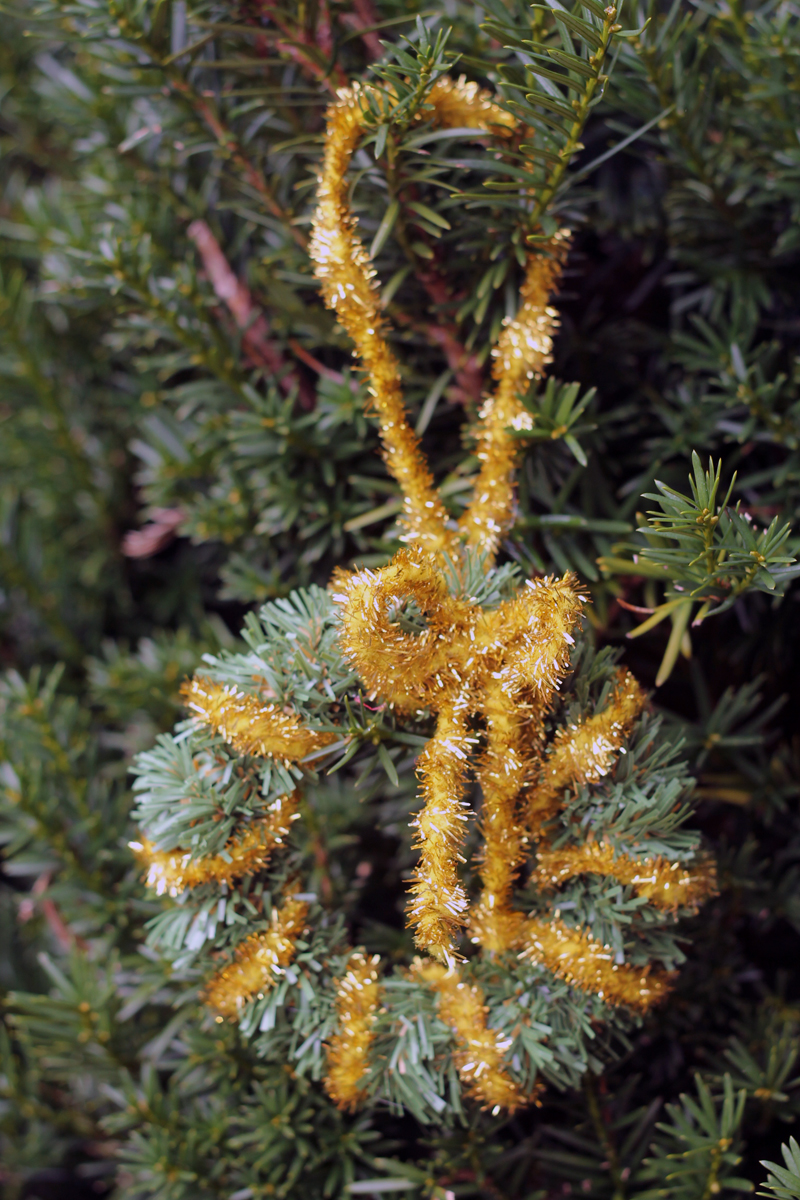
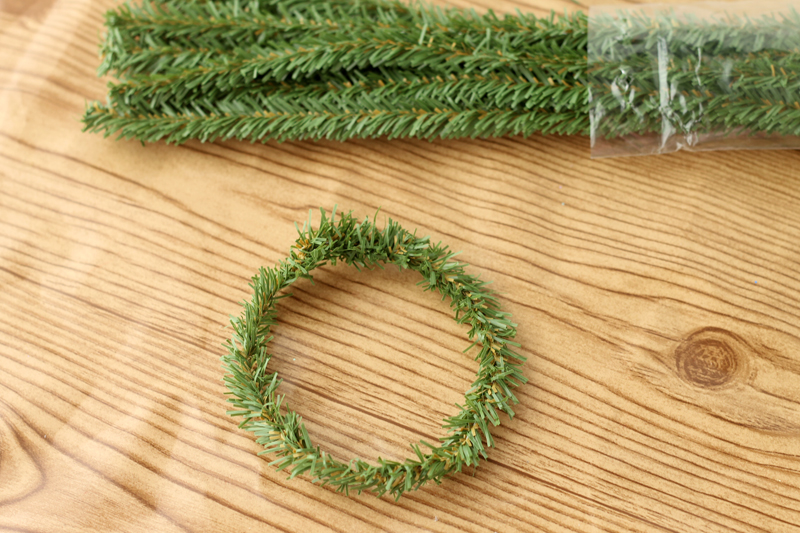
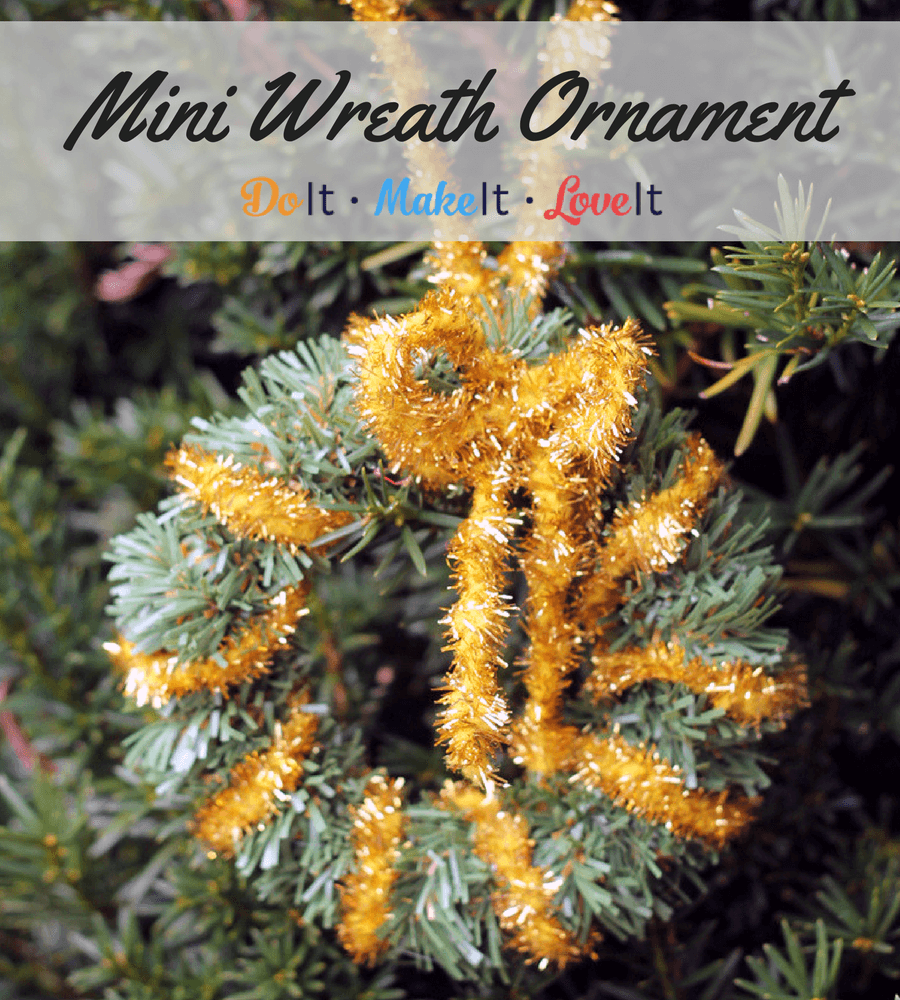
I just love wreaths. They are so pretty and fun to make, I have one for every season and definitely a few options for Christmas. When I found this evergreen chenille in the craft store, I could not pass up the chance to make mini wreaths! How cute right? This mini wreath Christmas ornament is an easy way to show off your love of wreaths and add a little shimmer to your green. Bonus if you have a white or colorful Christmas tree. add a little touch of classic charm to your modern tree with these mini wreaths!
This DIY Christmas ornament is another great kids craft idea! It’s so simple to make, you better set a limit or you’ll end up with 400 mini wreaths. Unless that’s what you want, then go for it! Making ornaments and other holiday crafts is a great way to create lasting memories without breaking the bank. Plus you get great ornaments to hang on the tree. A few minutes of crafting time and maybe a cup of hot cocoa are all you need for a family afternoon that will be long remembered.
Mini Wreath Christmas Ornament Tutorial

Supplies:
- Evergreen chenille
- Gold chenille
Instructions:
- Start with one evergreen chenille stem and form it into a circle as shown. Just wrap the ends around each other to secure.
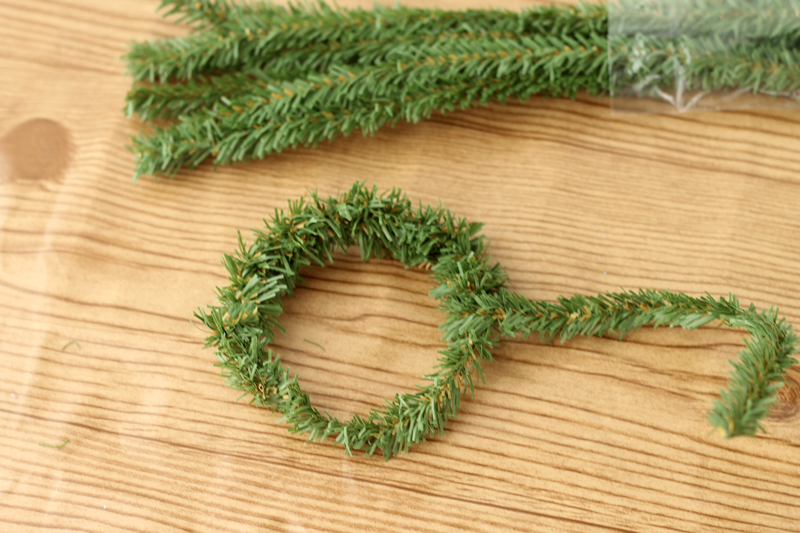
- Take additional evergreen stems and wrap them around the first tightly. To get a fuller wreath, I went around my wreath twice.
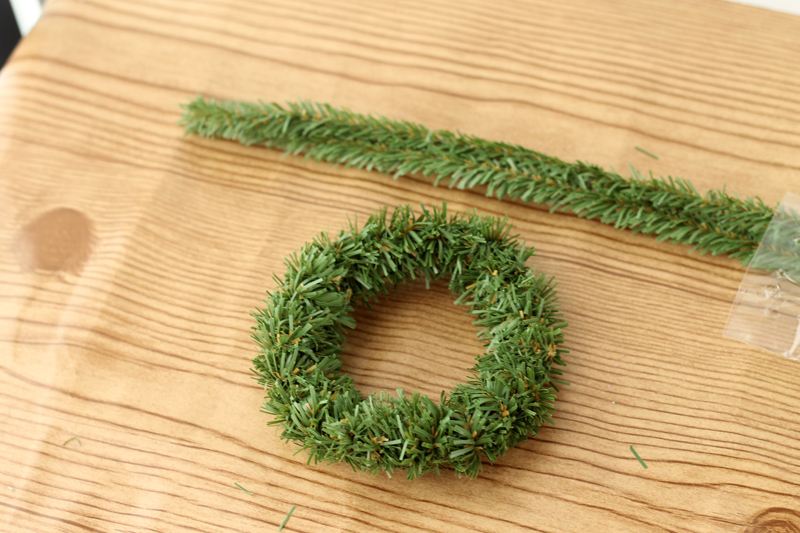
- No glue is needed for these steps just wrap to secure. One package of the evergreen stems is more than enough for one wreath ornament.
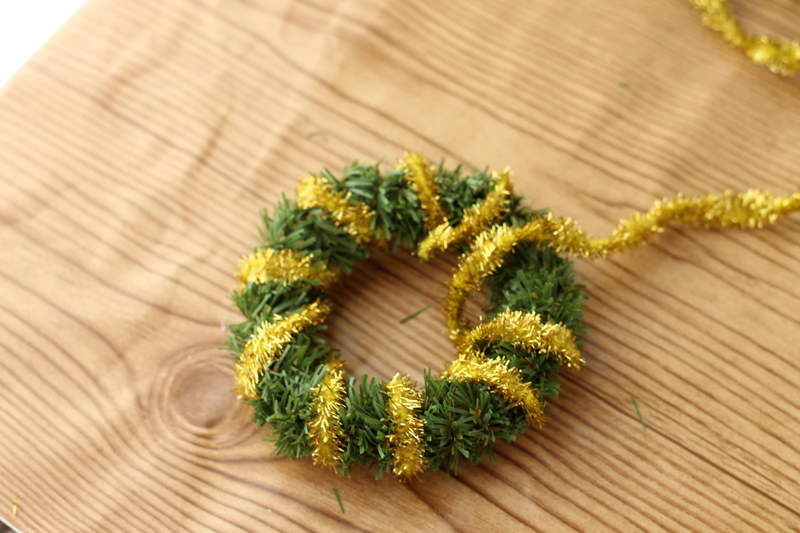
- Wrap the gold chenille around the wreath. This will have to be secured with glue.
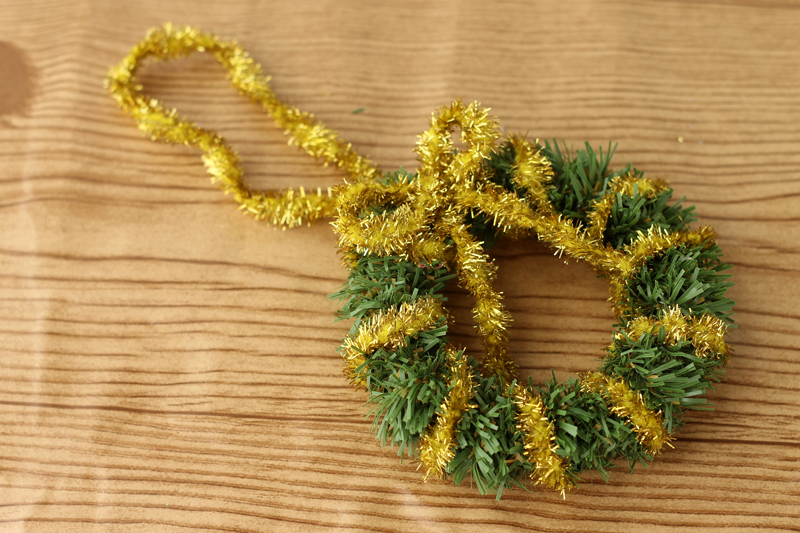
- Add a bow and a loop to hang. Secure these with glue as well.Glue
Make too many? Since these are so light they make a cute addition to your gift wrapping too! You could even tape one to the box and write the person’s name inside the wreath. So many cute ideas!
by Angie Holden | Nov 3, 2017 | Craft Tutorials
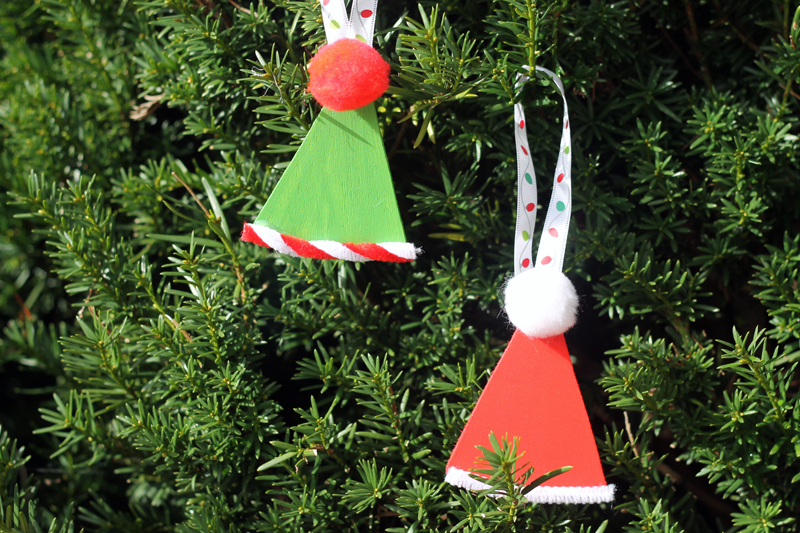
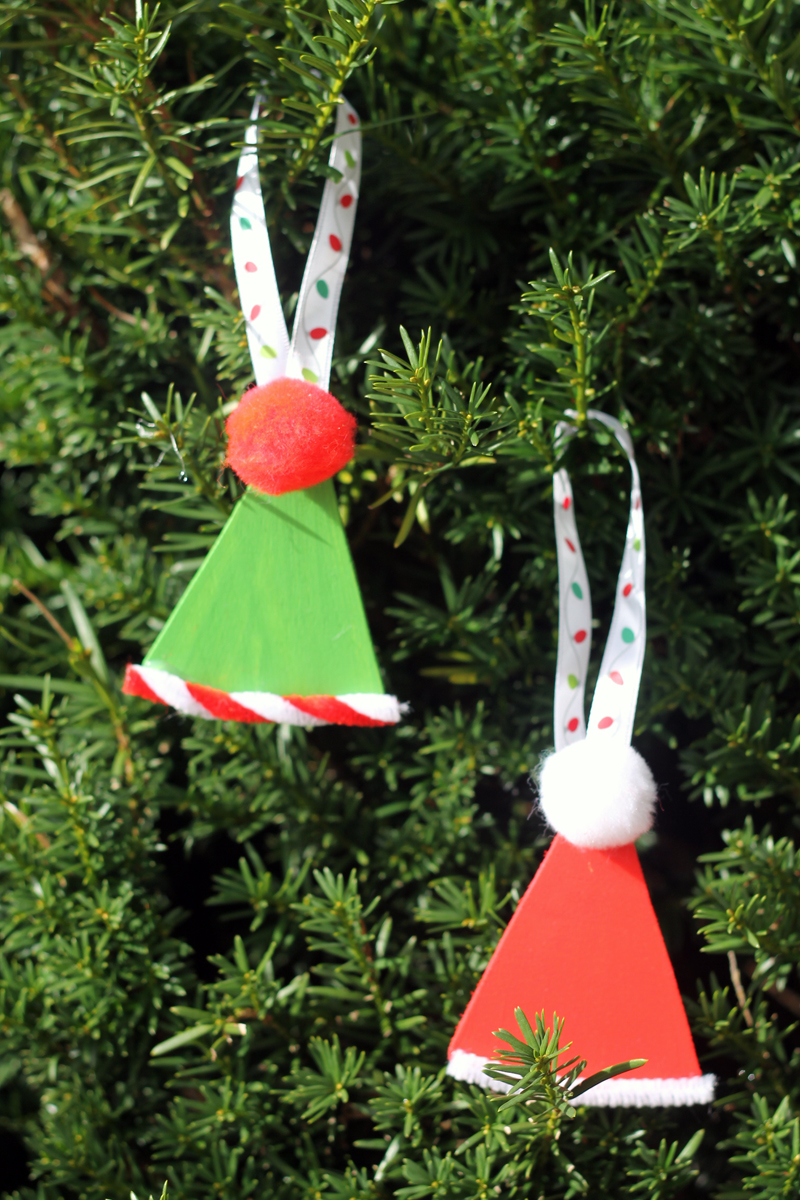
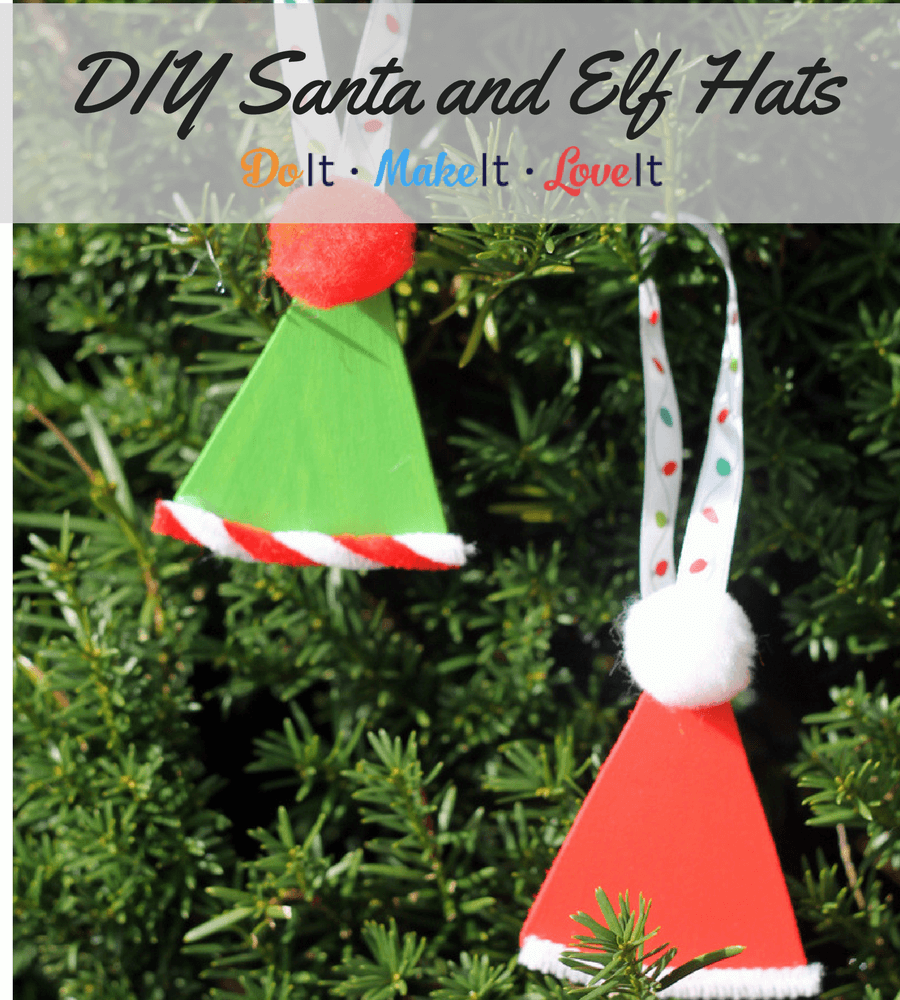
You can find some great stuff digging through the sale section at your craft store, especially after a holiday! These cute Santa hat Christmas ornaments were actually made from candy corn wood slices! With a little creativity, they’re cute elf and Santa hats for your tree. This is why it always pays to shop the bargain bin. These Santa hat ornaments are so easy to make and they’re lightweight so you can even use them as gift tags.
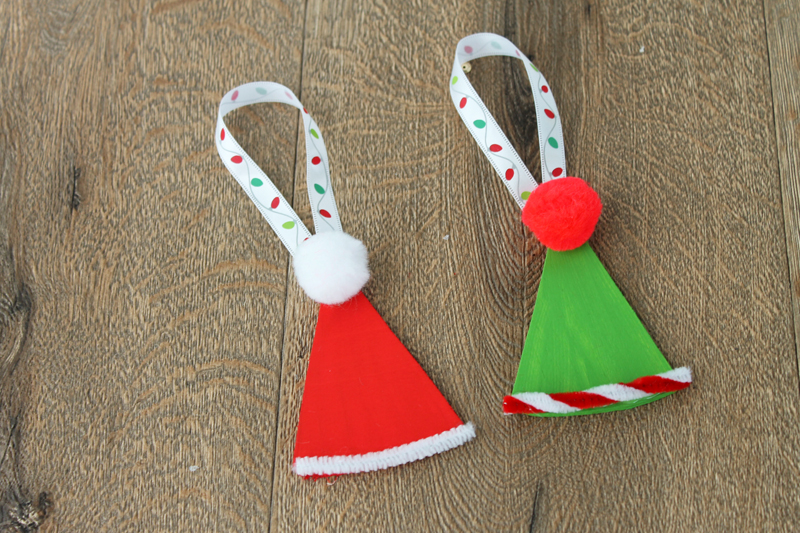
You will want to stock up on these wood candy cane shapes when you find them because this ornament is a whole lot of fun to make and you’ll want to make TONS of them. Since they are so simple to make and relatively mess-free, they’re great for kids too! I love having easy craft projects handy around the holidays. When the kids are out of school but it’s too cold to play outside and you have a mile long to-do list, simple craft projects are my lifesaver! This Christmas ornament craft is a good one because they can make as many as they want and in all kinds of styles and you can hang them up on a pretty piece of yarn as garland.
DIY Santa Hat Ornaments
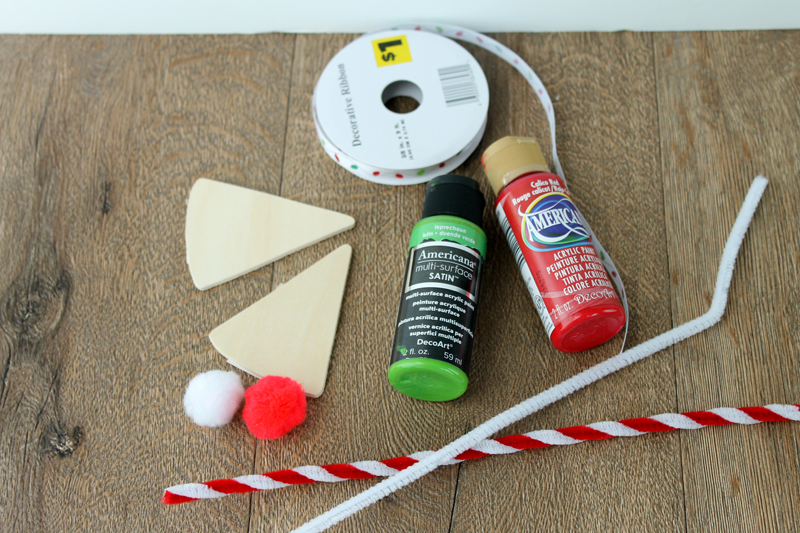
Supplies:
- wood candy corn shapes
- pom poms
- pipe cleaners
- paint
- ribbon
- glue
Instructions:
- Paint the candy corn first with the color of your choice. Allow to dry.
- Glue on pom poms, pipe cleaners, and ribbon as shown to complete the hat ornament of your choice.
Wood candy corn shapes work perfectly for these ornaments because of the rounded edges. Change up the pom pom and pipe cleaner fringe for any Christmas character you can imagine. This same idea can be used for Christmas trees so be sure to stock up on the shapes when purchasing!
What kind of hats did you make? Share them with us on our Facebook page or let us know on Instagram.
by Maggie Kmiecik | Aug 15, 2017 | Craft Tutorials
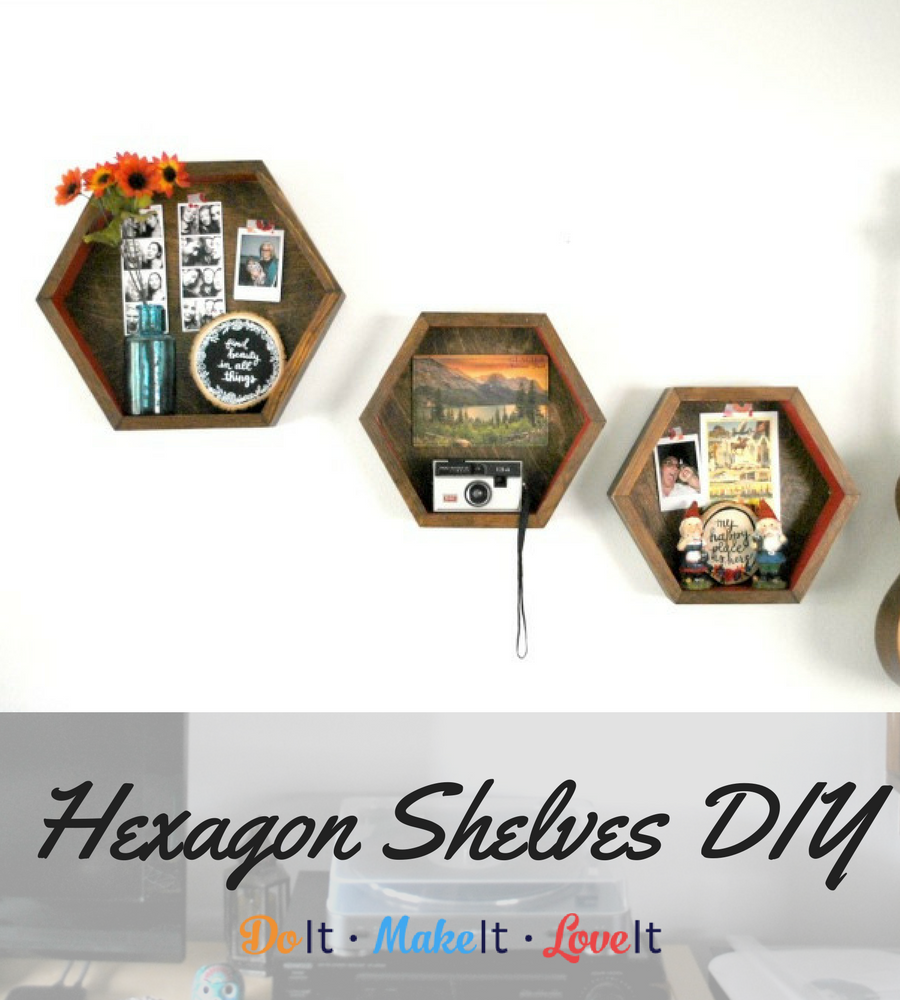
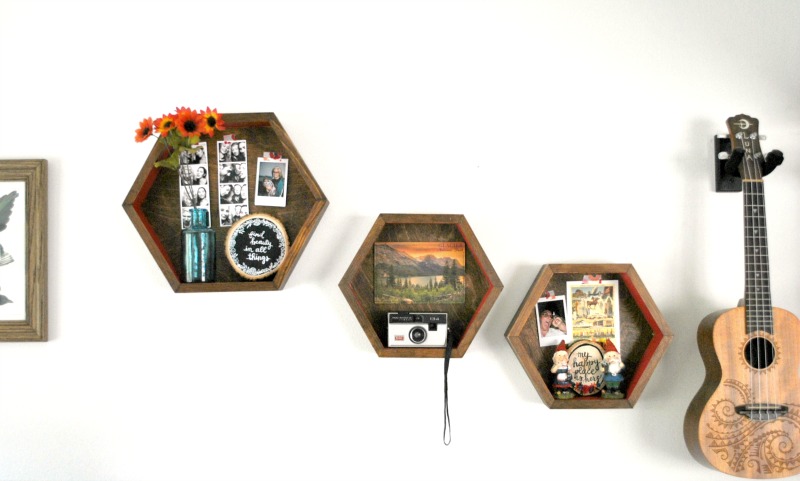
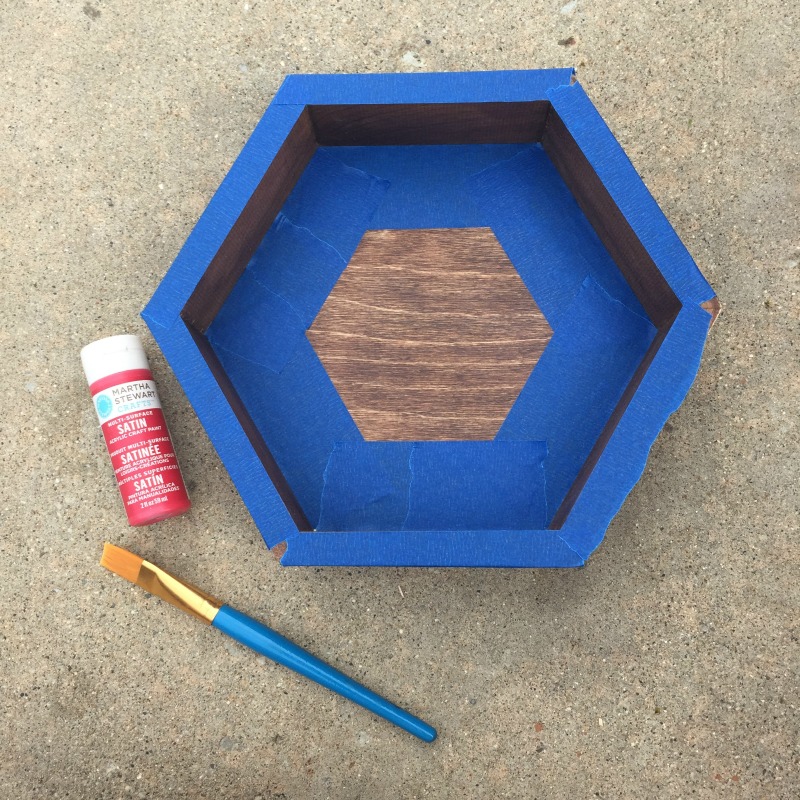
Have you seen the hexagon wall decor trend all over Pinterest too? It got to me big time and all I could think about was making cute little hexagon shelves for my apartment. Since I have a very specific color scheme for my apartment, I really couldn’t find exactly what I had imagined so I decided to make my own hexagon shelves. I found these awesome large and small pine shelves from Walnut Hallow and snagged them up!
They were exactly what I needed – a blank canvas. I wanted something that was either the right wood color or that I could stain and paint, so these are absolutely perfect. They come slightly sanded but unfinished so they are ready to stain as soon as you get them in your hands. I have to say I am obsessed with this stain color. It took to the pine so well.

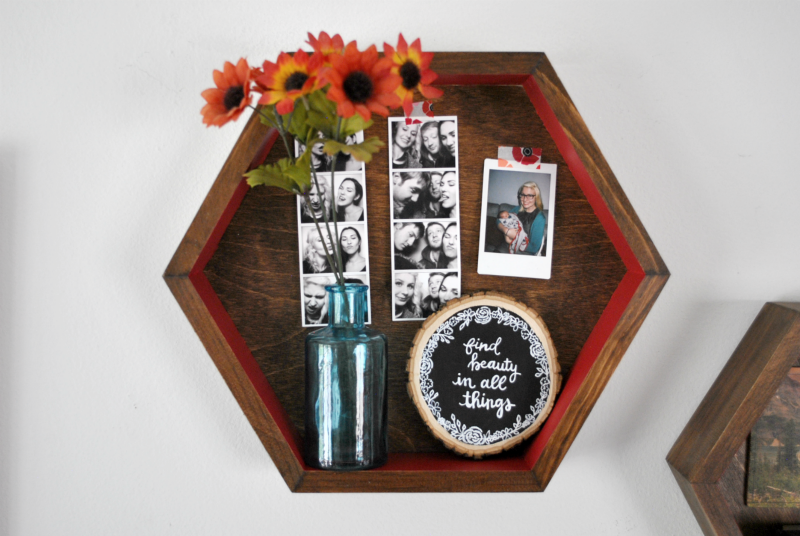
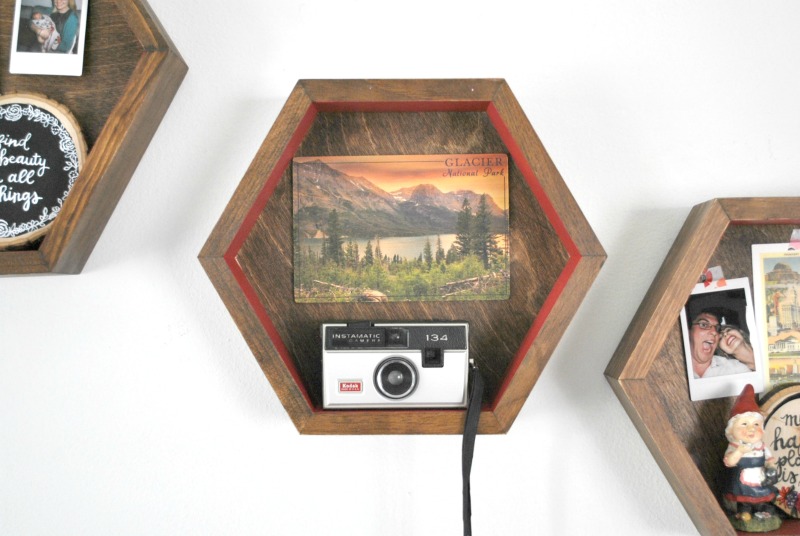
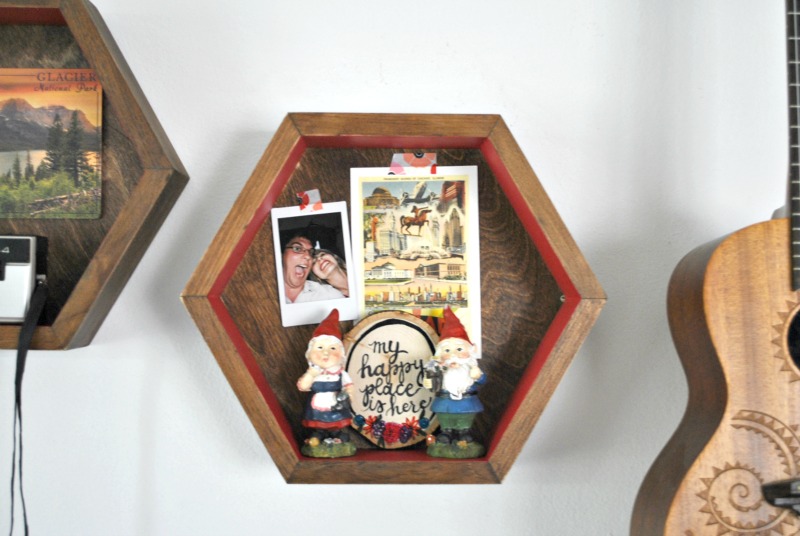
I gave them just a little pop of red on the inside because I didn’t want to the color to be the focus and I love how they turned out!

DIY Hexagon Shelves
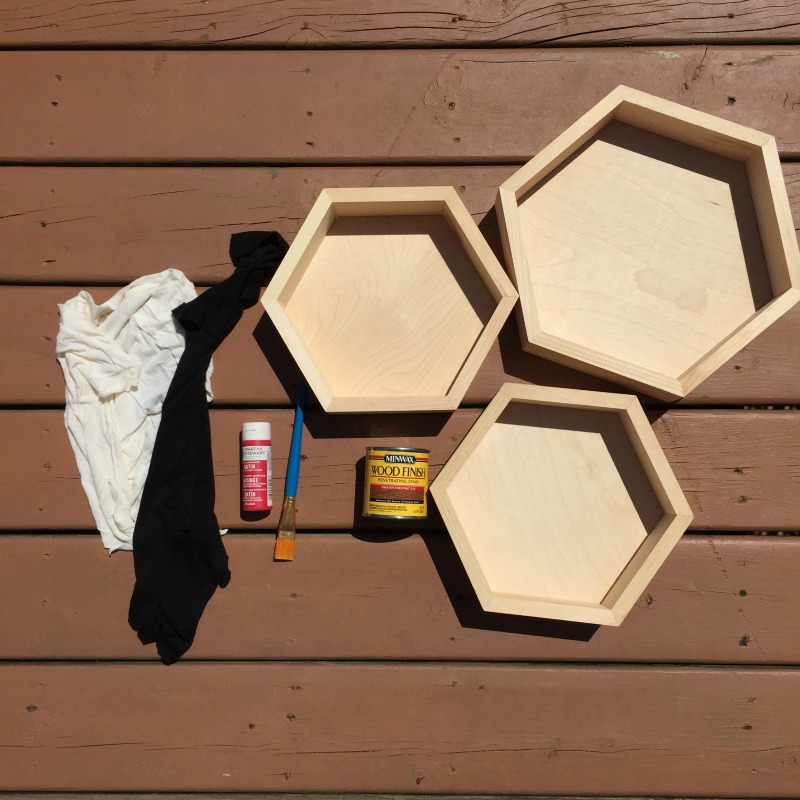
Supplies
We’ve included affiliate links throughout this post to make collecting your supplies easy! If you have any questions, please take a look at our disclosure and privacy policy.
Instructions
- Time to stain! Grab your stain and your rags and apply the stain to the hexagons as directed. You can also use a brush for this step if you prefer, but I like using a rag because it means I can wipe off as I go too. It’s handy to have a clean rag even if you are using a brush in case you get too much in one spot.
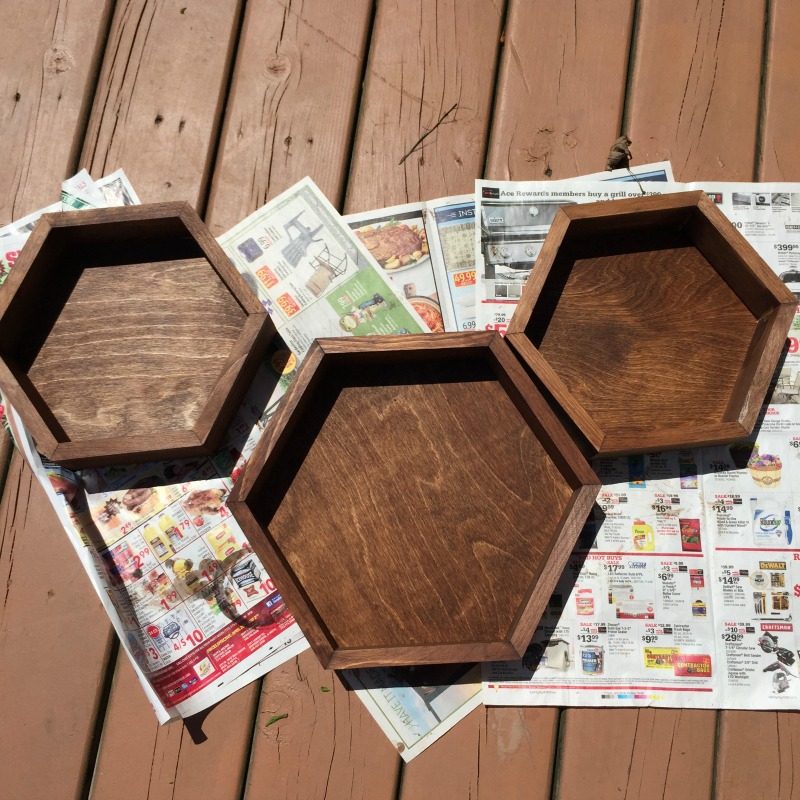
- Let your stain dry overnight and now it’s time to seal. I like the rub on polyurethane, but any sealer will do. Just make sure to avoid sealing the inner edges since we’ll be painting those with craft paint and craft paint doesn’t stick very well to freshly sealed surfaces. Let dry according to your product’s directions.
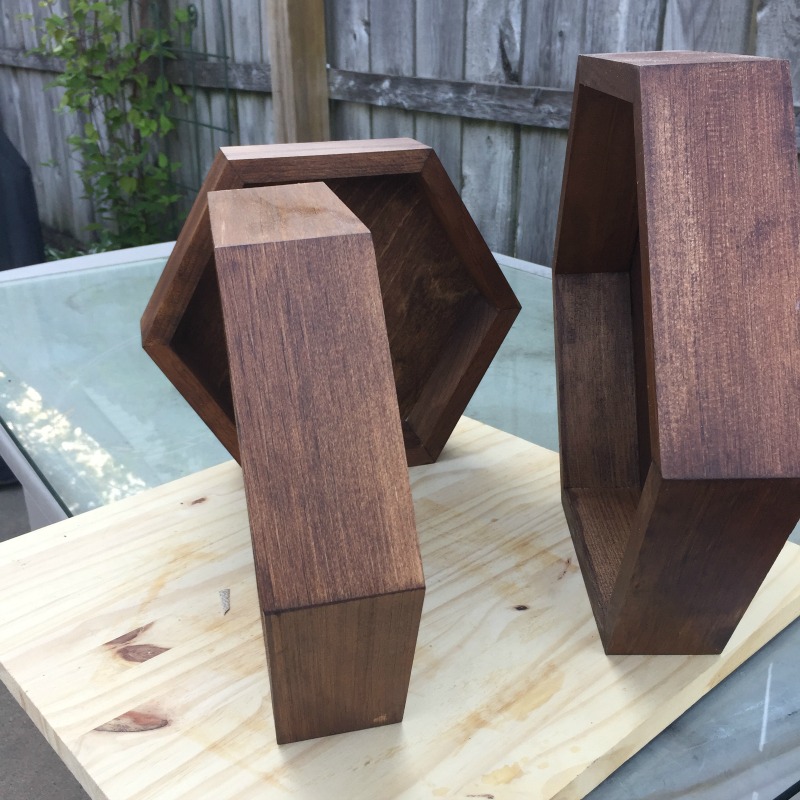
- Tape up the parts around the edges where you’ll be painting.
- Grab your brush and paint your edges! This is the fun part. You could even tape up some designs on the back panel or paint the front edges if you want the color to pop more.
- Grab the flat piece with teeth from your picture frame hanging kit and hammer it into the very top of your hexagon with the little nails that come in your kit. Make sure you hammer it into the thicker edge and not the thin back.
- Hang up your brand new shelves and have fun decorating!
I collected all my odds and ends and just used a little bit of colorful washi tape to hang up some pictures. I am so happy with the way they turned out.
Did you make your own version? We’d love to see them! You can share them on our Facebook page or tag us on Instagram.