by Simone Collins | Dec 11, 2017 | Craft Tutorials
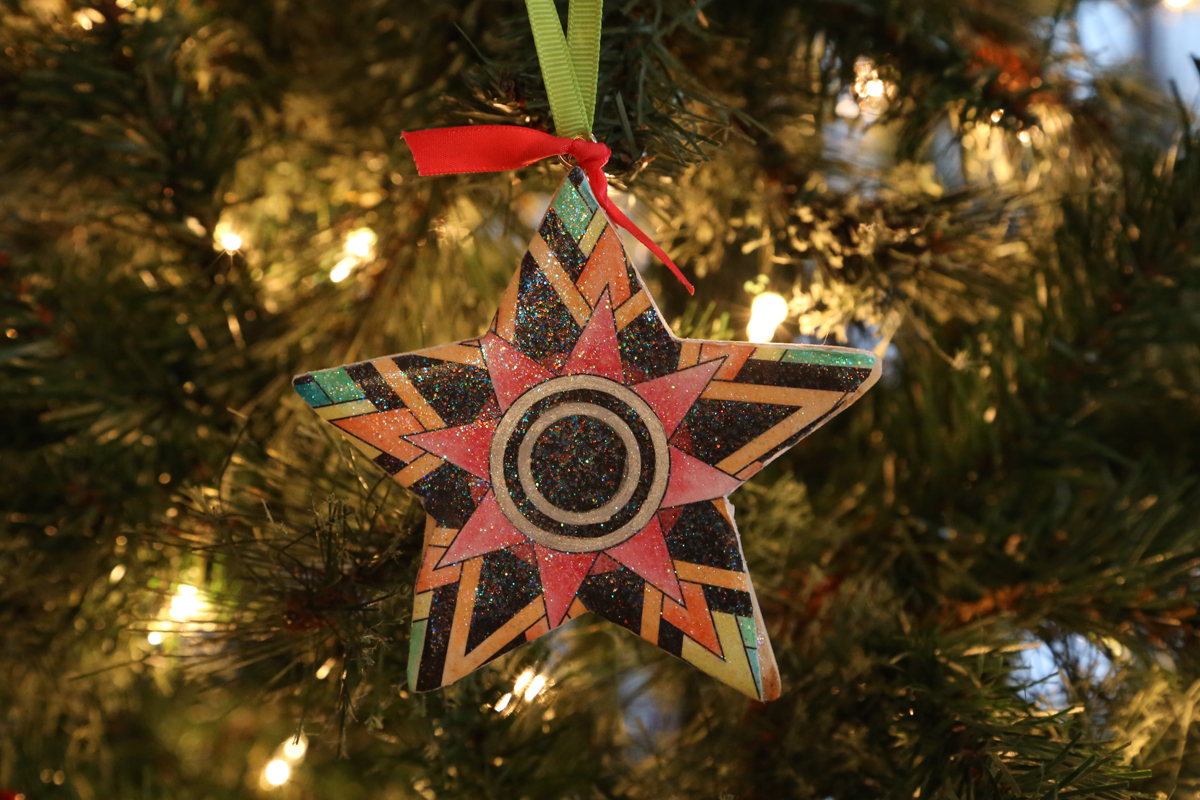
We’ve all been suckered into those adorable coloring books and I am no exception. I love those things. Adult coloring books are such an easy way to pass the time creatively without having to worry about how your page is going to turn out at the end. Coloring book pages are my new sudoku. They help pass the time and keep my brain active. But what do you do with all your finished coloring book pages? Of course, some I never want anyone to see and should probably just burn them, but there are other pages that I’m really proud of. So I’ve been trying to come up with creative ways of displaying my artwork. This simple coloring book page ornament is one of them!

How To: Coloring Book Ornament
Supplies:
- Coloring Book Page
- Color-In Water Color Pencils
- Color-In Water In Brush
- Wooden Ornament, the shape is up to you.
- Mod Podge
- Foam Brush
- Pencil
- Scissors
- Ribbon, optional
Instructions
- Color your image using the Color-In Water Color Pencils. Blend your colors using the Color-In Water In Brush.
- Once your image is colored, allow it to dry completely.
- Using Mod Podge and a foam brush, apply the glue to the front of the wooden ornament and back of the coloring book image. Smooth out the image on to the ornament.
- Use the Mod Podge to cover the top of the ornament and seal it. I chose to use Glitter Mod Podge but any variety will work.
- Allow to dry completely and add ribbon if desired.
There you have it, a simple way to use some of those masterpieces you’ve been hiding in your coloring books. This is also a creative way to show off kids artwork if your fridge has no more room! Surprise the kids with their own artistic ornaments to put on the tree. They’ll be so proud of themselves when they see their work lit up by sparkling string lights.
As always, we love to see your projects! If you made this project or another project you’d like to share with us, share a picture on our Facebook page or tag us on Instagram.
by Angie Holden | Dec 9, 2017 | Craft Tutorials
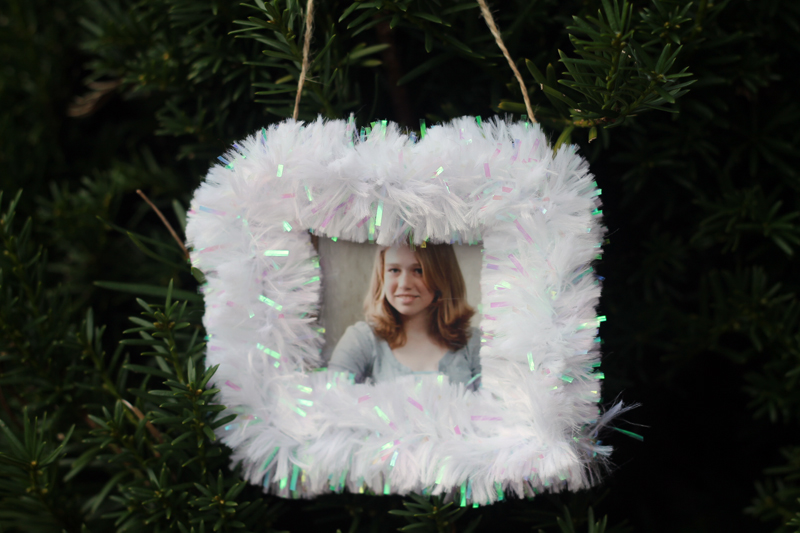
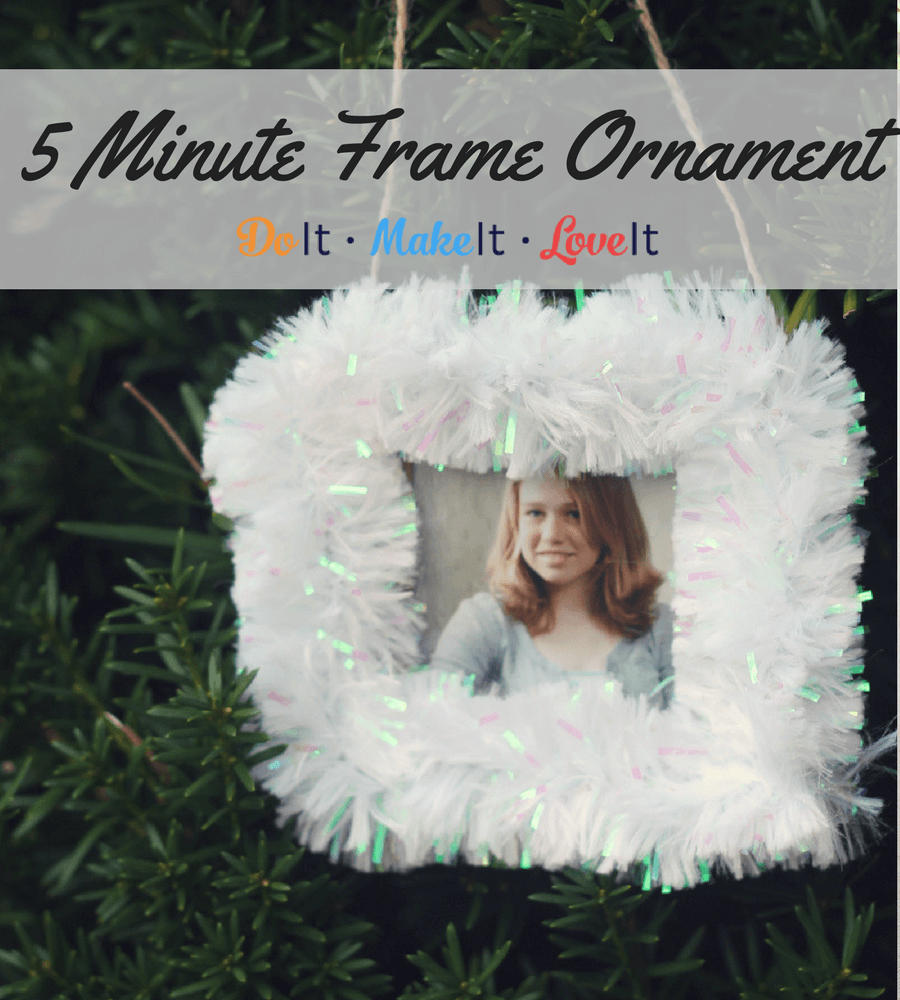
What’s better than embarrassing your nearest and dearest with old photos on the biggest family holiday of the year? Hanging those photos from the Christmas tree, that’s what! Of course, if you’re not into embarrassing family members, it’s also nice to add them to part of your holiday decor. Use this adorable DIY frame ornament to decorate your tree with faces you love!
This simple and sweet handmade Christmas ornament can be made in any colors that match your tree decor because they are decorated with pipe cleaners! You can even make each frame in that person’s favorite color. We opted for the sparkly white because it felt the most like Christmas!
Is your tree already so full of ornaments that it’s going to topple over? You can also use these as creative gift tags. Writing out name tags is so expected. Just make a few of these simple pipe cleaner frames and add a photo of the recipient, tie or tape it to the package, and give your gift with a little panache. If you have a photo printer handy, making lots of these at one time is a breeze.
Simple Pipe Cleaner Frame Ornament
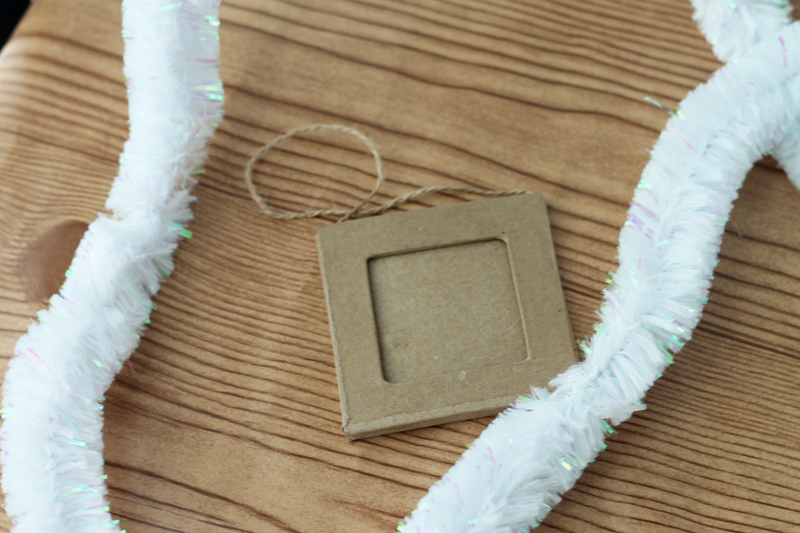
Supplies:
- Extra large chenille stems
- Plain frame ornament
- Glue
- Scissors
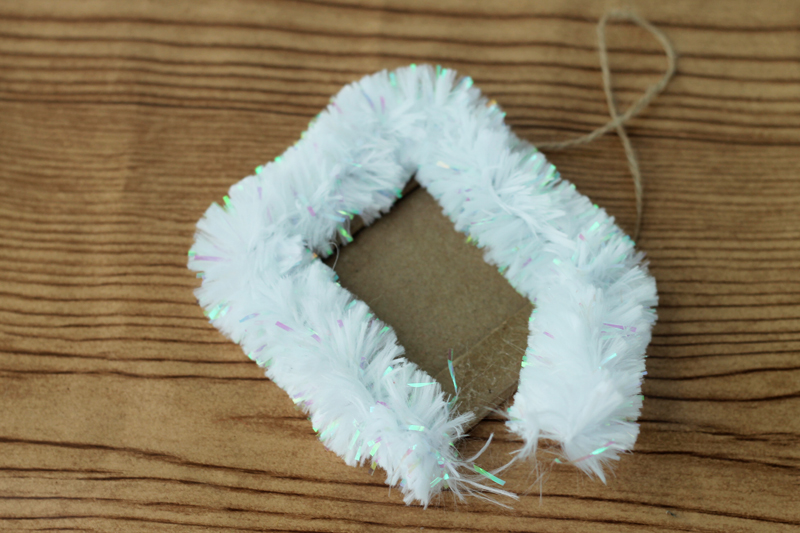
Instructions:
- Wrap the chenille around the frame bending at the corners. Trim to length with scissors.
- Glue the chenille to the frame and allow to dry. Add a picture before hanging on the tree.
Did we say it was easy or what? DIY Christmas tree ornaments that are easy like this are perfect for kids crafts too. Get the whole family involved this Christmas by making a bunch of DIY ornaments. You and the kids can even have a small tree dedicated to the ornaments you make together and that they can grow up with!
We’d love to see what you’re working on! If you made this project or another project you’d like to share with us, share a picture on our Facebook page or tag us on Instagram.
by Simone Collins | Dec 7, 2017 | Craft Tutorials
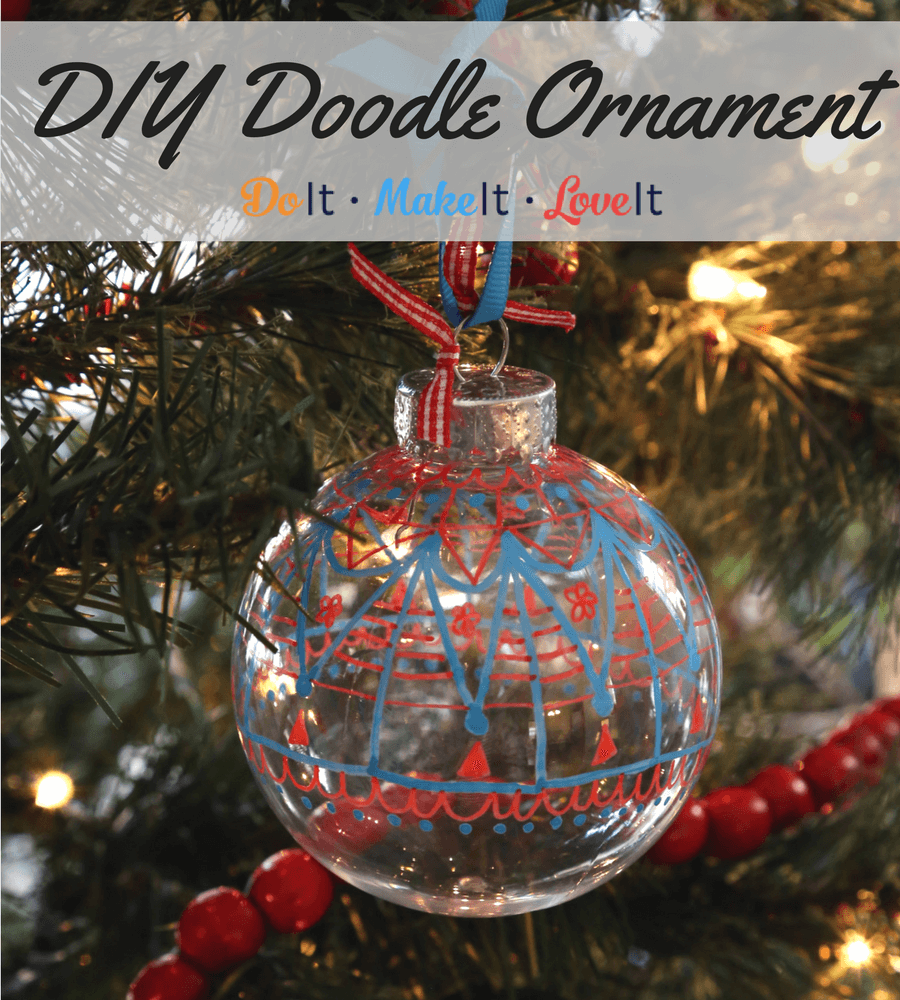
Get creative this Christmas with a fun DIY doodle ornament! If you’re a chronic doodler, like me, this is just another way to unleash your creative side and end up with a cute DIY Christmas ornament while you’re at it. Handmade Christmas ornaments should represent your personality and style, otherwise, why make them? This DIY doodle ornament is great at that. You get to design a special handmade ornament that will be passed down through the years!

This is also a great family or classroom project. Kids crafts that double as Christmas decor are my favorite thing. Since the ornaments are plastic they are less likely to break if dropped by little hands. This kids craft gives young people an opportunity to showcase their art skills in a way that lots of people can admire them and they give adults a fun, relaxing way to spend a cold afternoon. Bonus, you can even do this while binge watching Netflix!
DIY Doodle Ornament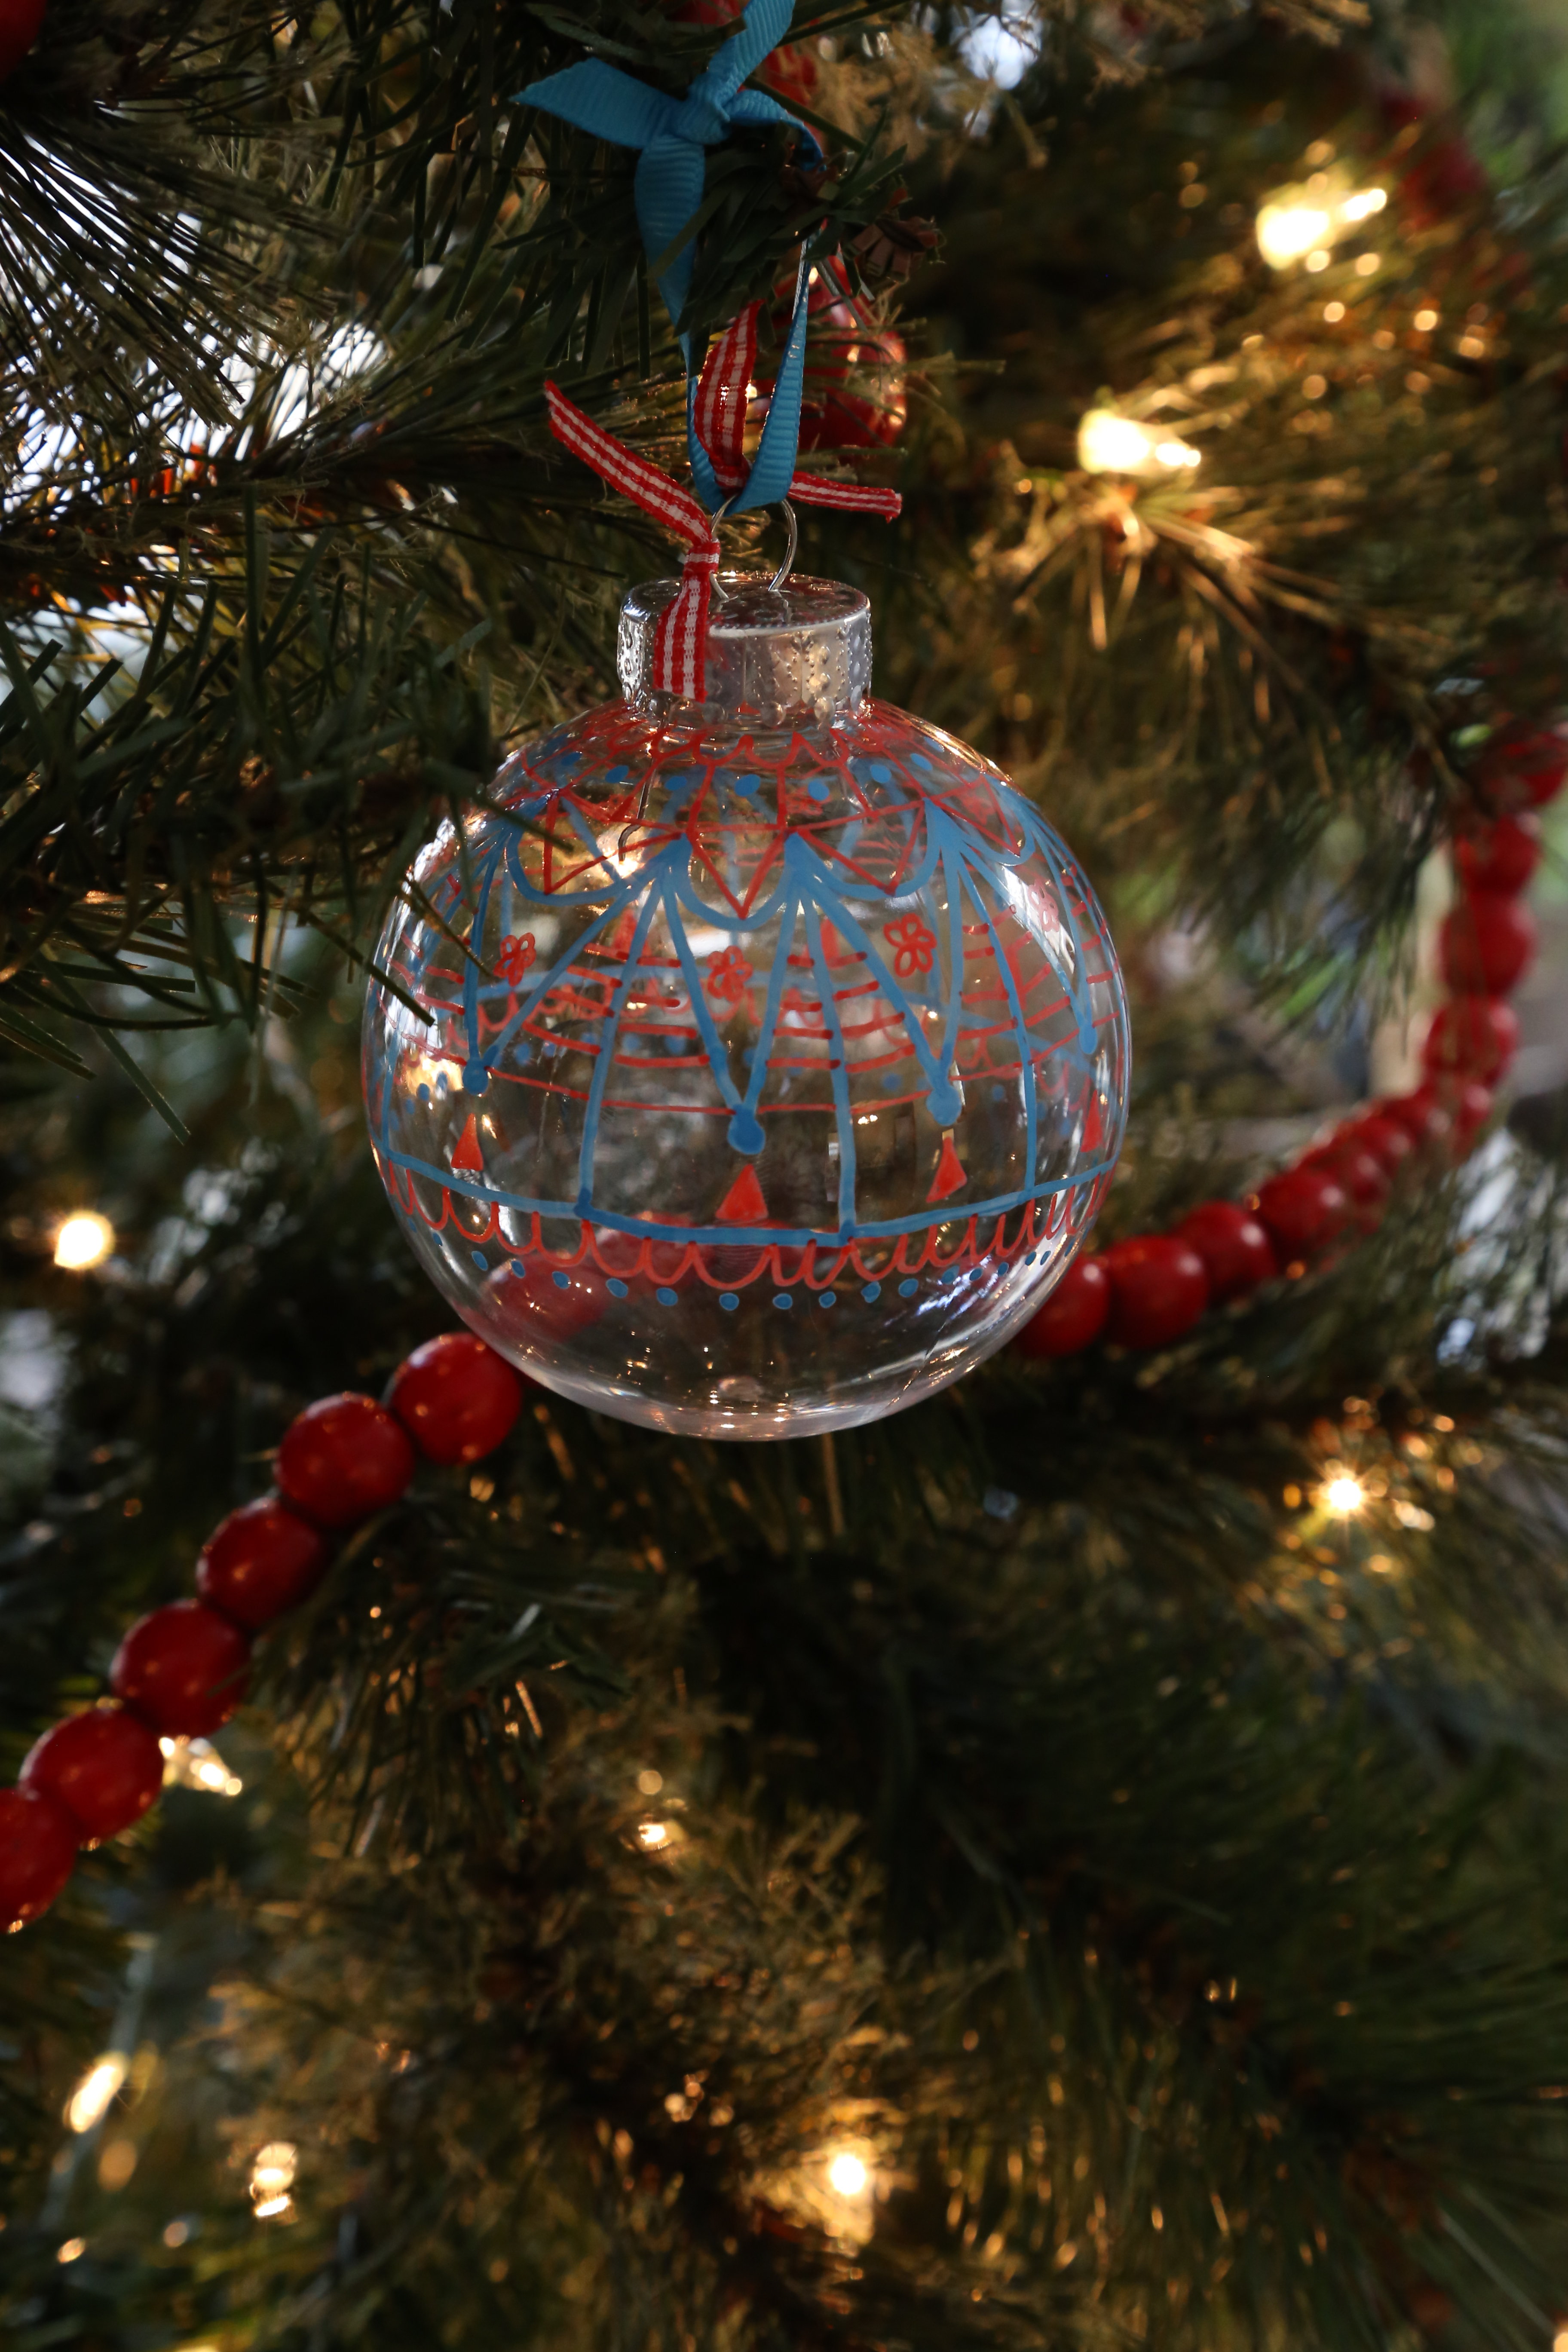
Supplies
- Plastic ornament
- DecoColor Paint Markers
- Ribbon, optional
Instructions
- Choose two coordinating DecoColor Paint Markers.
- Remove the topper from the ornament.
- Starting at the top of the ornament, start doodling your design using the DecoColor Paint Markers you chose.
- While filling in your design, it is best to start with more open areas and add details later.
- Between the layers, allow to dry or dry faster using a low temperature on your hair dryer.
- When your design is completed, add ribbon and hang.
Paint markers are best for this project since they give you a lot of control in what you’re doodling, but acrylic paint and tiny paintbrushes would work too. It all depends on your preference. The end result will be the same: a beautiful, creative DIY ornament shining on your tree!
Did you make one? Two? Twelve? We want to see! Share a picture on our Facebook page or tag us on Instagram.
by Angie Holden | Dec 5, 2017 | Craft Tutorials
It’s a magical time of year! Doesn’t it seem like the holidays just inspire creativity? Even people who don’t craft 340 days out of the year start to feel the urge come December 1st. This DIY Christmas ornament tutorial is perfect for those who love super easy projects. This project only takes a few minutes to complete. The longest part of making these DIY Christmas ornaments is the glue drying time! You can make a whole set for yourself, to gift, or write your guests names on them and use them as table settings.
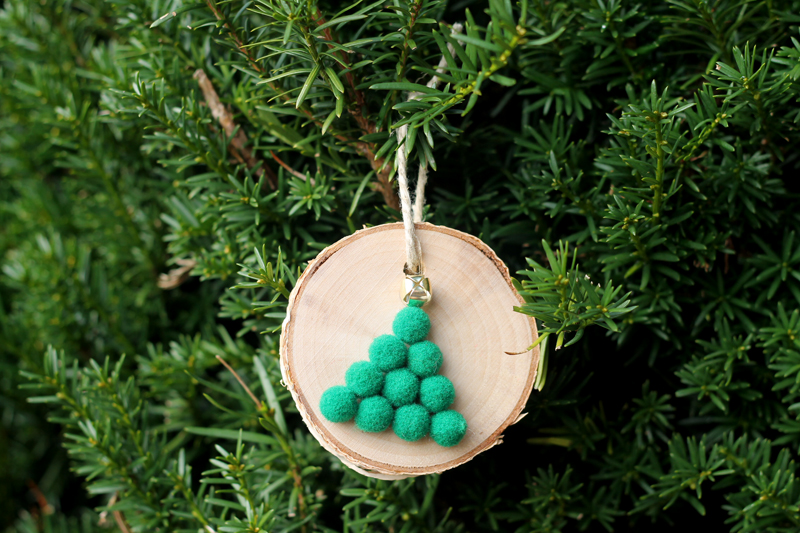
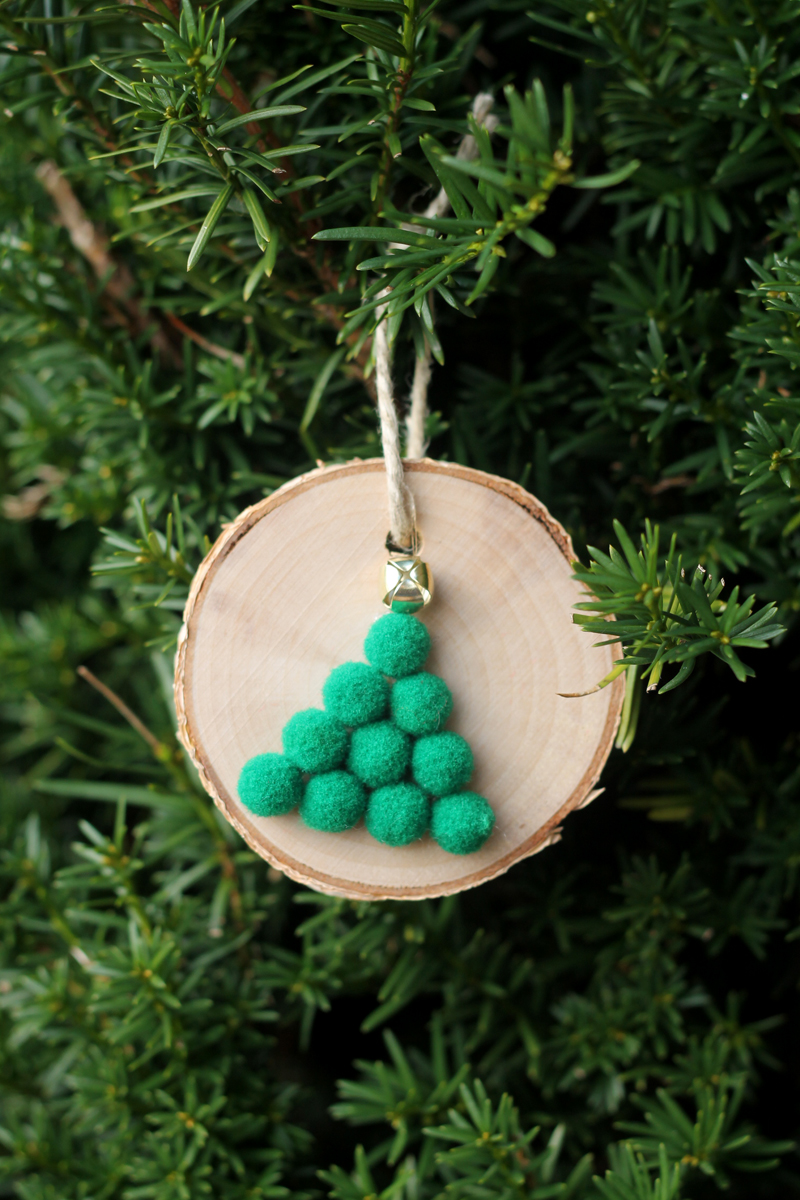 Wood slice ornaments can be found at most craft and hobby stores. They have the bark left on them for a rustic touch. They also have the twine hanger already added which makes crafts like these super simple. We seriously love these. They are so easy to customize and always look so professional when finished. They go so well with any color scheme, but if you’re looking for that white/gold nordic minimalist look that’s so popular this year, this is it!
Pick up a few of these and you can decorate your whole Christmas tree by adding your creativity to these rustic ornaments. You can even change it up by creating pom pom trees in purple or blue! Add your favorite colors to the mix for a pretty ornament set.
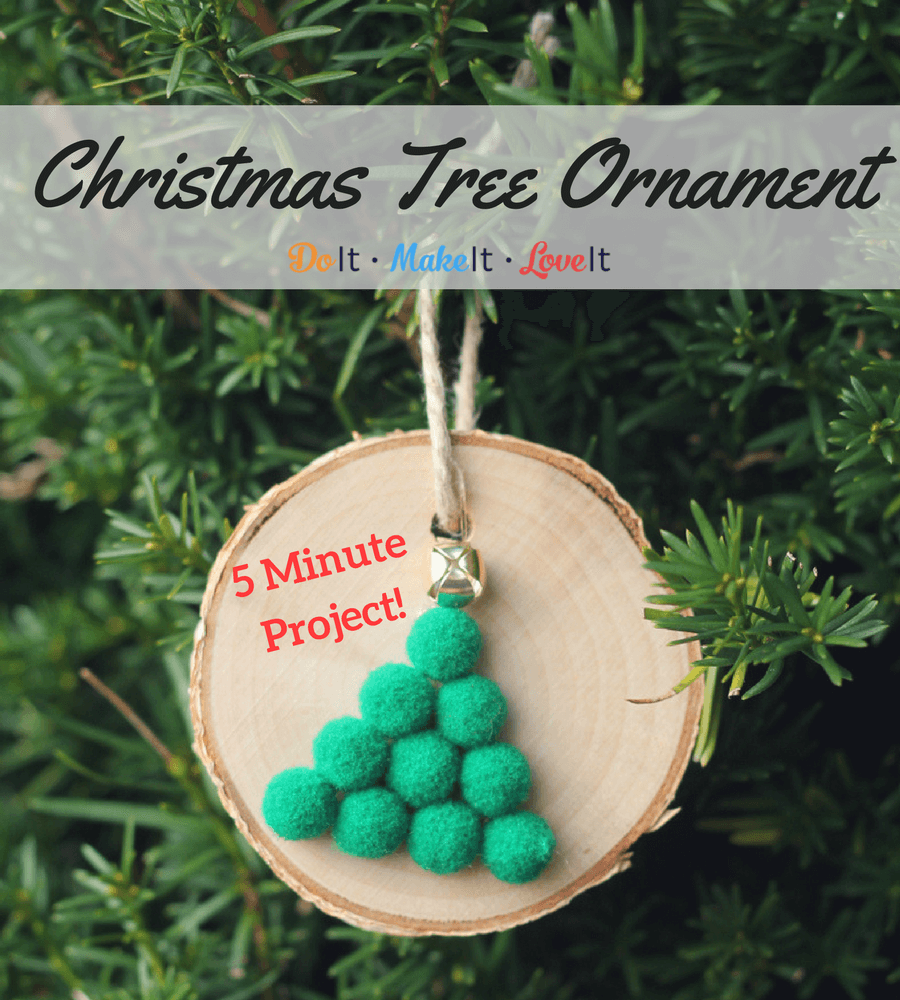
Wood Slice Tree Ornaments Tutorial
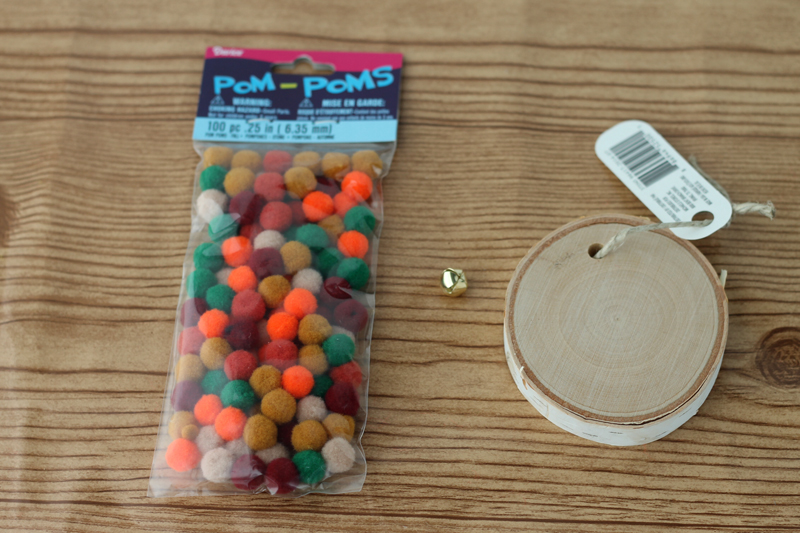
Supplies:
- Wood slice ornaments
- Pom poms
- Gold bells
- Glue
Instructions:
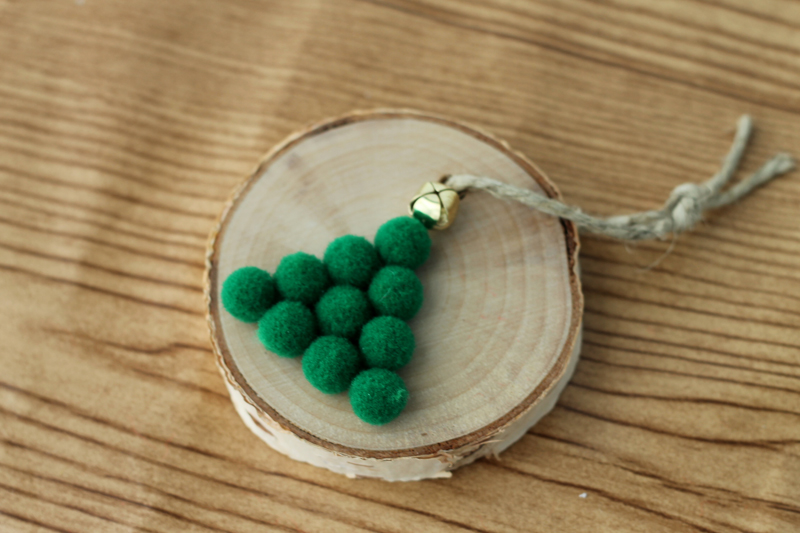
- Pick out 10 green pom poms.
- Arrange the pom poms in a tree shape on your wood slice. Move it around and center it however you like!
- Glue the pom poms in place. Let dry per glue instructions.
- Optional: use small pom poms or paint to add colorful dots to your tree branches to look like lights or ornaments.
- Glue your gold bell to the top of the tree. Let dry and add your new creation to your Christmas decor.
How easy was that? Now, these make great ornaments, but they’re also a fun kids craft idea to keep little hands busy and they also work as adorable table settings. You can write the names of your guests on them with a marker for a rustic, charming place setting. Experiment with laying the pom poms out in other shapes and with other colors as well! Christmas is about creativity, right? 😉
As always, we love to see your projects! If you made this project or another project you’d like to share with us, share a picture on our Facebook page or tag us on Instagram.
by Simone Collins | Dec 3, 2017 | Craft Tutorials
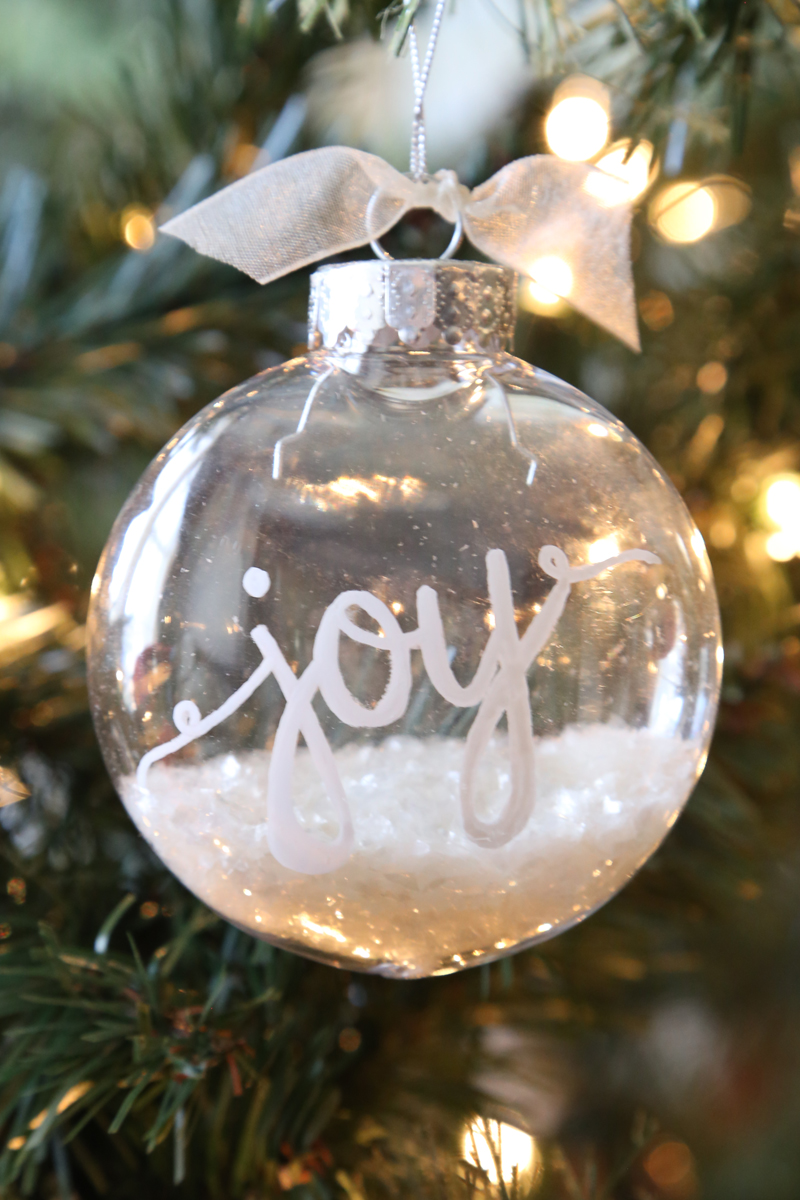
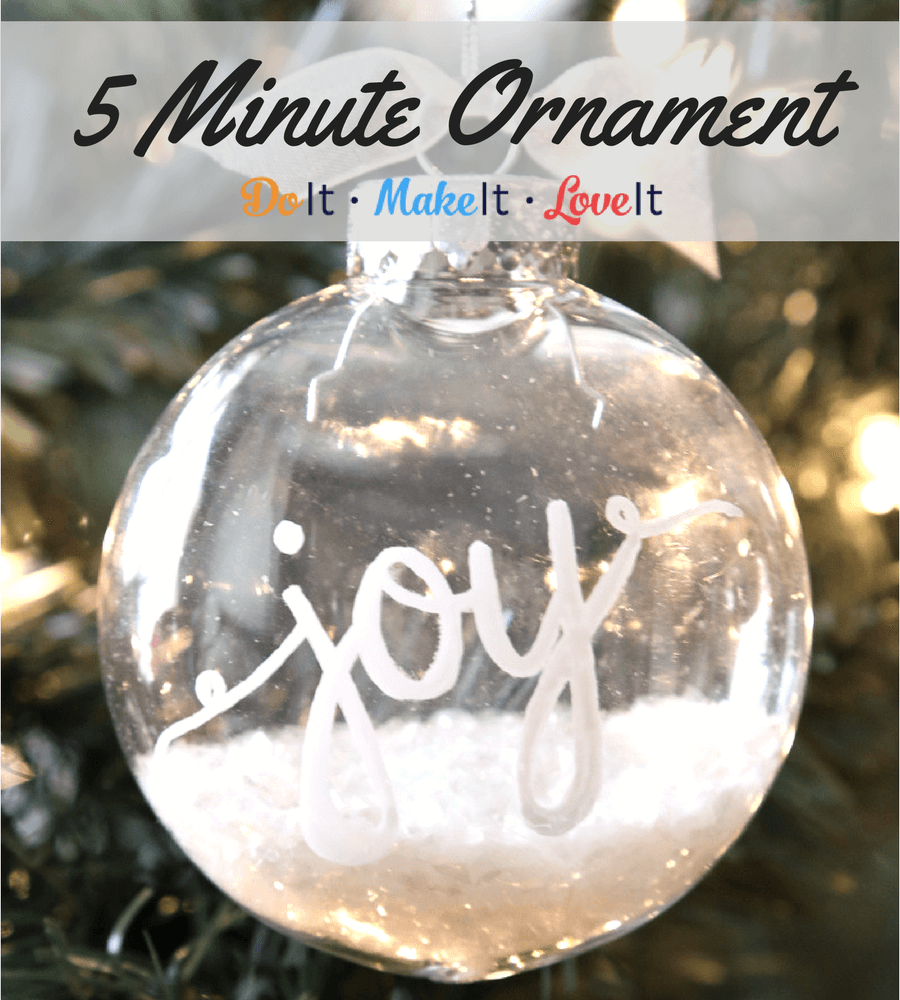
Sometimes the prettiest handmade ornaments are the simplest. I’ve really been loving the all-white Christmas tree decor trend, but I couldn’t bring myself to buy all new ornaments for a trendy tree. Luckily, I had a couple extra sets of clear plastic ornaments and some money to spend at the dollar store. This DIY Christmas ornament won’t take you more than 5 minutes to make and you can make a whole tree full of them in an hour. It’s a perfect solution to anyone that wants to temporarily change up their Christmas tree decor!

What words come to mind for you during the holiday season? Joy, Peace, Gratitude, Love? Add them all to your handmade ornaments! It can be an inspiration tree this year since we all probably need a little positive inspiration right now. Not loving the white Christmas trend? Fill your DIY ornament with any color glitter or confetti you love! The options are endless.
Simple 5 Minute White Christmas Ornament
Supplies
- Plastic Ornament
- Bistro Chalk Marker – fine, white
- Glitter or mica flakes or confetti
- Ribbon (optional)
Instructions
- Using a rolled up paper funnel, add glitter, mica flakes, or confetti to the bottom of your ornament. Put topper back on the ornament.
- Write a message on the ornament with the Bistro Chalk Marker. Let dry.*
- Add ribbon and hang.
*The Bistro Chalk Marker is not permanent on a plastic ornament. You can choose to change the message from year to year or make a permanent version with a DecoColor Paint Marker.
This simple Christmas ornament also makes a great gift to commemorate an anniversary or special date. Just write the date on the ornament instead and your gift is ready to go! The best thing about this project is that it’s fast, easy, and budget-friendly. When you’re already spending an entire paycheck on gifts, budgeting on decor really counts.
Did you make one of these Christmas ornaments? We’d love to see! Share a picture on our Facebook page or tag us on Instagram.
by Simone Collins | Nov 29, 2017 | Craft Tutorials
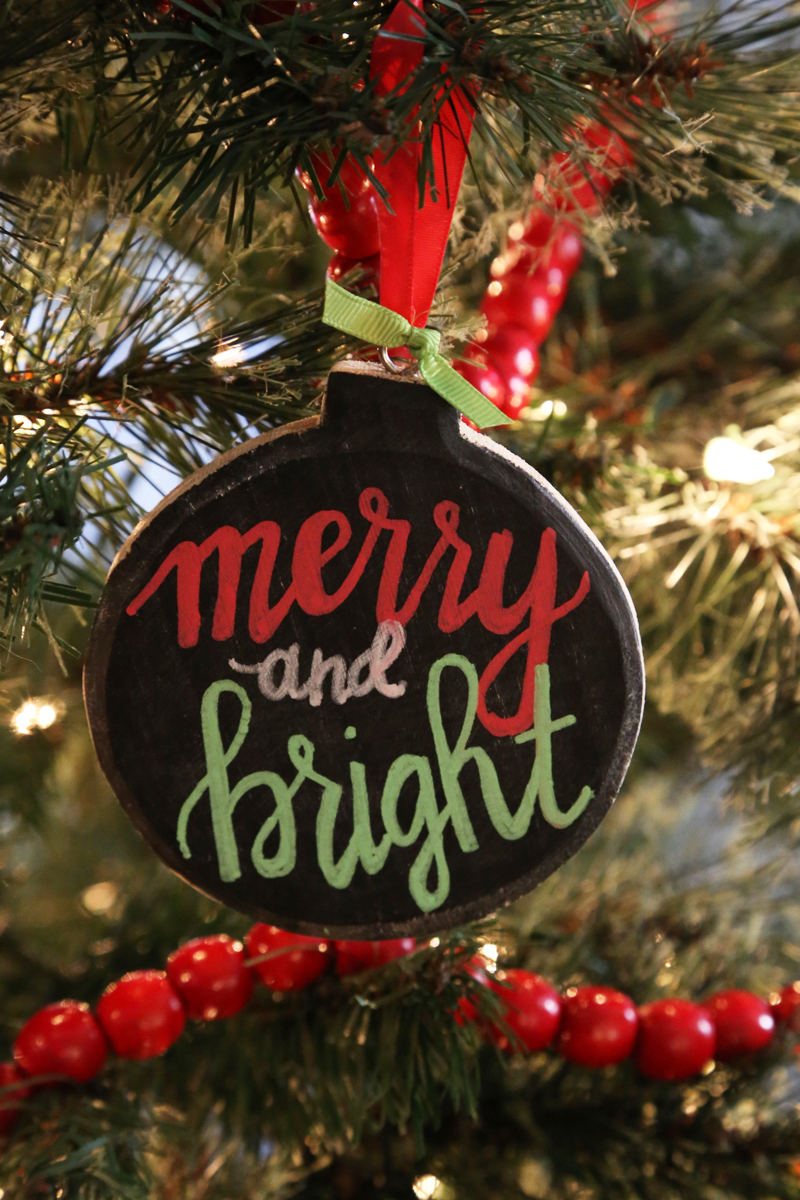
Christmas ornaments are the one thing in home decor that I like to keep traditional. I have hand-me-down ornaments from my parents and grandparents and a new collection I started with my own kids. I don’t want to buy new ornaments every year just to keep up with trends, but I do love the ornaments that come out every year. That’s why I always try to DIY an ornament at least once a year. Making your own Christmas ornaments is a great way to create new memories and traditions.
This year I was obsessed with everything chalkboard and I wanted to incorporate some of that into my Christmas decor! This DIY Christmas ornament is unbelievably easy to make and it turns out so cute!

Those blank wood ornaments at Target and Michaels are my favorite thing. They are the perfect blank canvas for creating your own special handmade ornaments. These little ones can even be used as gift tags! Just write out the person’s name and tape or tie it to the box. I mean, who isn’t tired of seeing the same sticker labels every year? Your gifts will definitely stand out.
How To Make a Simple Chalkboard Ornament
Supplies:
- Wood ornament
- Easy Chalkboard Marker, black
- Bistro Chalk Markers, red, green, and white
- Pencil
- Plain white chalk
- Ribbon, optional
Instructions:
- Use your Easy Chalkboard Marker to add a chalkboard finish to your wooden ornament. Allow it to dry.
- Condition your chalkboard surface by taking a plain piece of white chalk and covering the surface. Wipe off with a plain paper towel.
- Design your sentiment using a pencil first, lightly.
- Trace over your design using the Bistro Chalk Markers. Allow it to dry.
- Add ribbon if desired.
*The Bistro Chalk Marker is not permanent on this ornament. You can choose to change the message from year to year or make a permanent version with a DecoColor Paint Marker.
That’s all it takes to start your own tradition of making a Christmas ornament every year! Pretty simple, right? Since this project takes little time and almost no mess, it’s another great kids craft idea. It’s a genius way to keep little hands busy with minimal supervision while you’re making dinner, packing presents, and cleaning the house all at the same time (supermom status, am I right?). You can even cut an extra long piece of ribbon and kids can wear them as necklaces. Now you have an alternative to name tags too!
As you can see, there are so many creative ways you can make this simple, quick craft. Show us your creativity on our Facebook page or tag us on Instagram.


