by Maggie Kmiecik | Nov 13, 2017 | Craft Tutorials
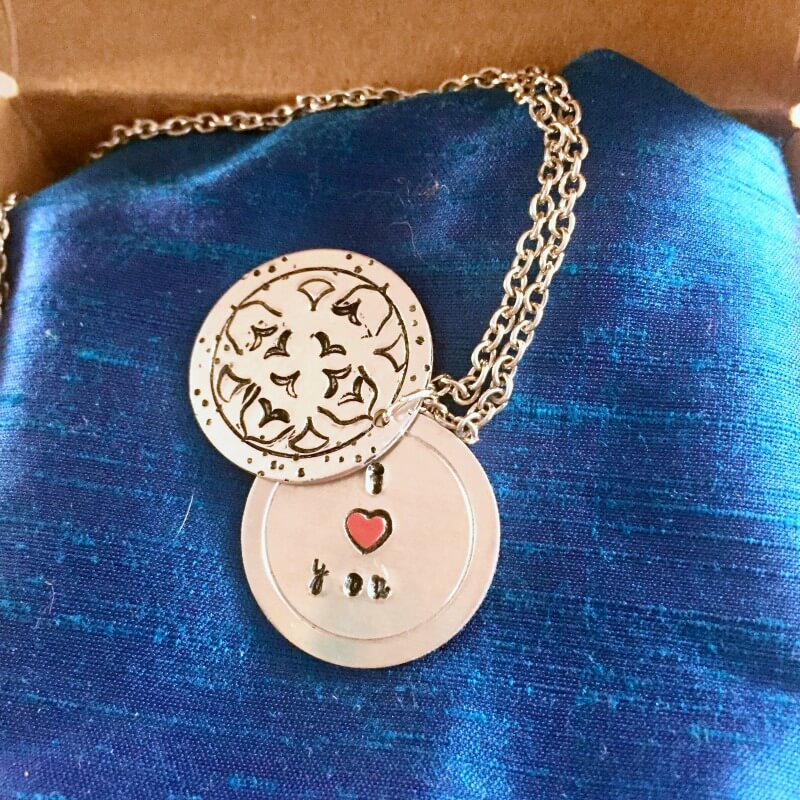
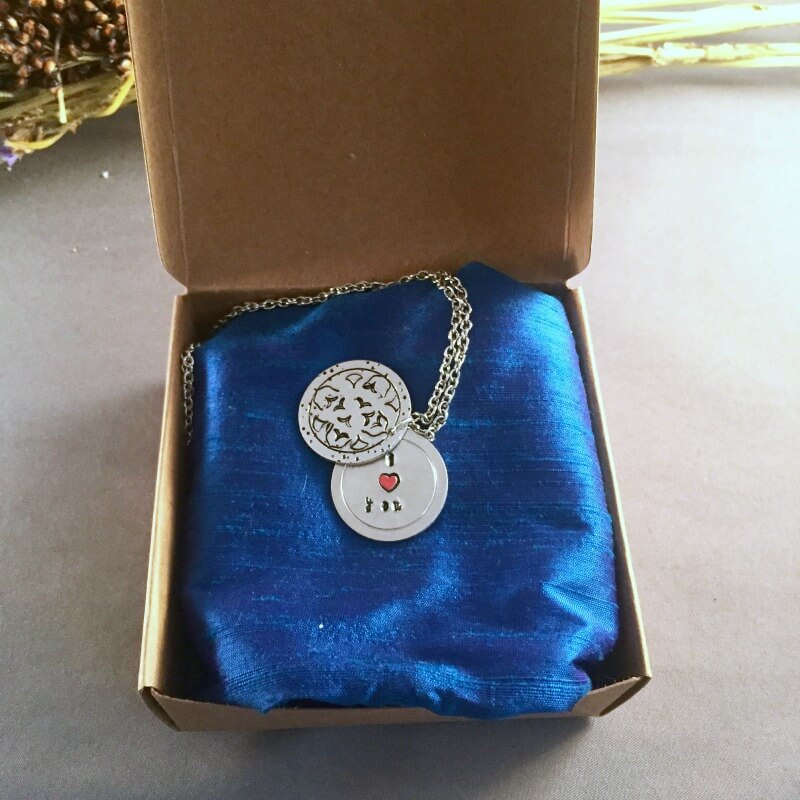
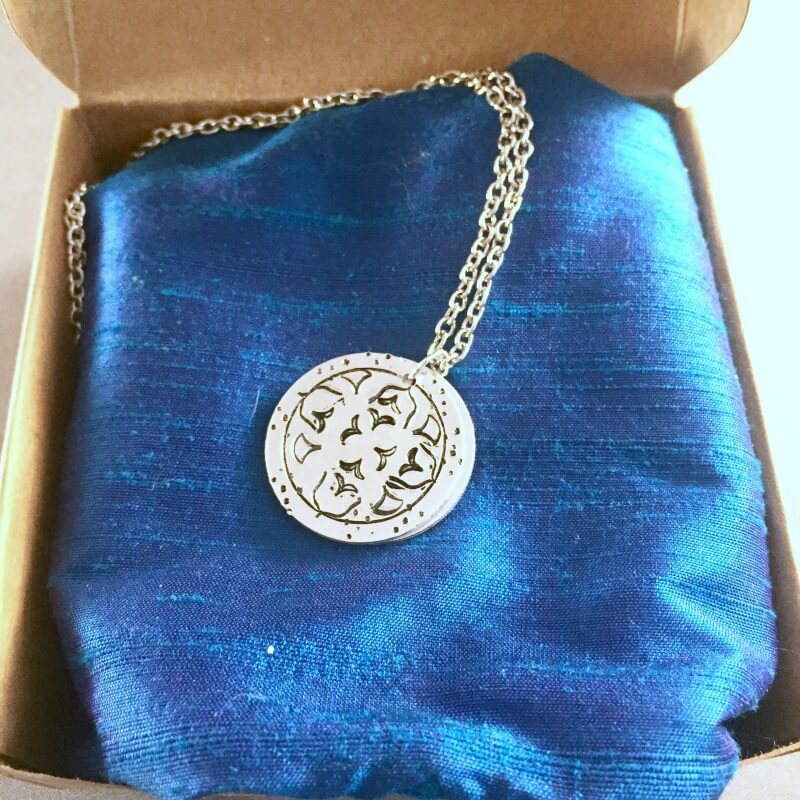
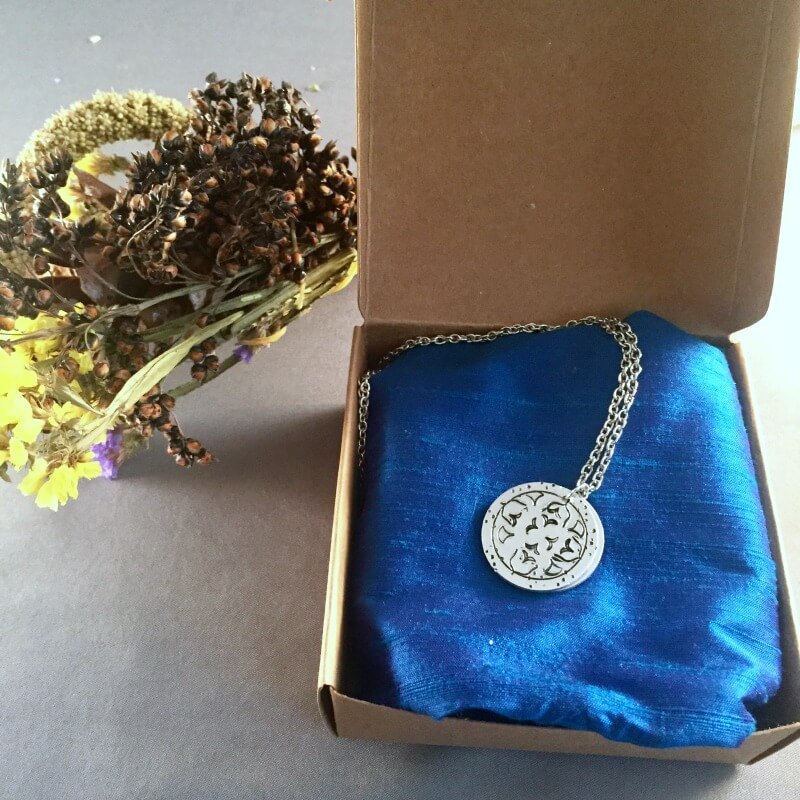
I love simple but meaningful gift ideas. Since I gravitate towards jewelry, I always look for fun jewelry projects that I can turn into easy gift ideas. This hand stamped secret message necklace is just that! This necklace would be pretty on its own, but the secret message makes it an extra special handmade gift that anyone can appreciate. Making this metal stamped necklace is way easier than it looks! Especially, when you have all the right tools.
If you’re a metal stamper, you’re probably pretty familiar with ImpressArt. They are fantastic at understanding what you need for metal stamping and every year they come out with new products that just make stamping so simple. Metal stamping is how I started playing around with metal because it was the easiest thing to do without learning how to be a metalsmith! Not to mention, it’s so fun! Get your aggression out by hammering some metal! It’s the best stress therapy.
I’ve always been a big fan of ImpressArt and their selection of metal stamping tools and accessories. I was so excited to be able to work with some of their newest products to come up with this project. Keep scrolling to learn how to make this metal stamped secret message pendant for yourself or someone extra special!
How to Make a Hand Stamped Secret Message Necklace
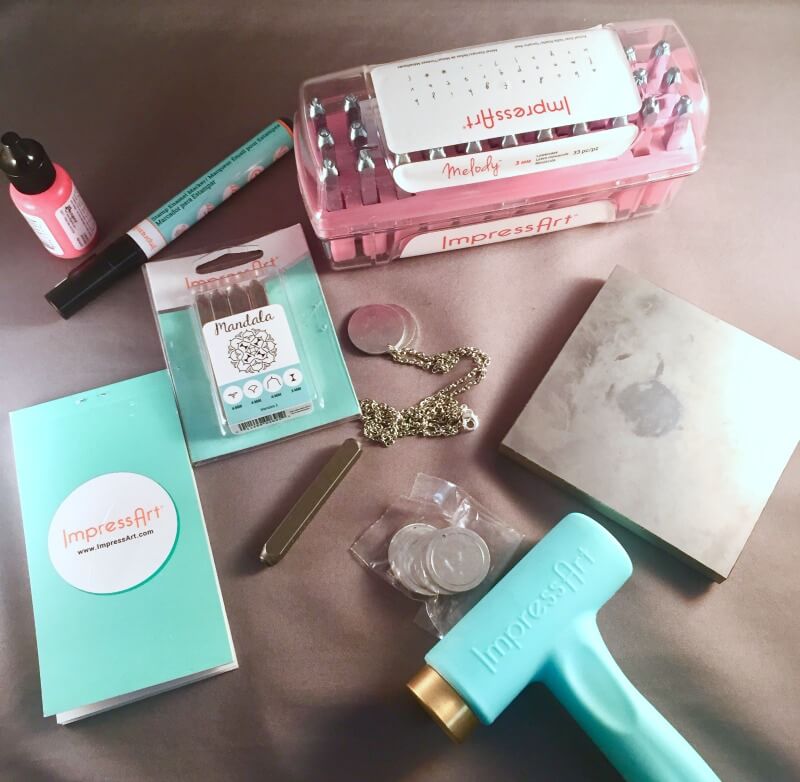
Supplies:
The supply list below includes affiliate links. If you purchase your supplies using this link, it won’t cost you extra and we’ll earn a little commission to help support the blog! Check out our disclosure and privacy policy.
Instructions:
- Plan out your design. Think about which stamps you will be using and how you want them to be laid out. Take a few minutes to sketch out your ideas before getting to work. I found that taking an extra minute or two to plan makes a world of difference in your final piece.
- Lay your front circle blank on the stamping block and place one of the circle grid adhesive stickers from the stamp guide onto your piece. These stickers have been life-changing. You can stamp right over them and see your piece while working because they are clear. Highly recommend if you plan on doing a lot of stamping, if not, you can always hand draw a grid with a Sharpie and ruler.

- Begin stamping your mandala pattern on your front piece. I just did a simple pattern and then textured the edges with one of my texturing stamps. Once you’re done, pull off the remaining sticker and set aside.
- Place your second circle blank on the stamping block. If you need a stamping guide, the little book also comes with a sticky ruler so you can align your words! Stamp your message on and set aside.
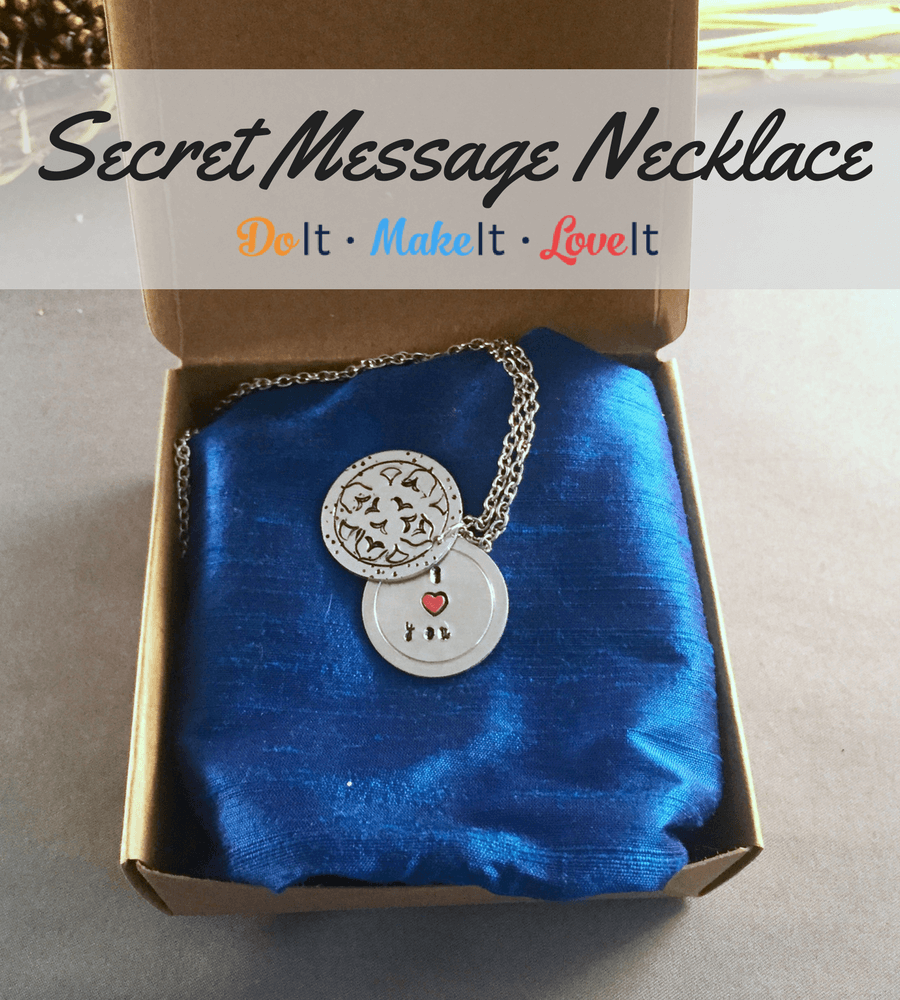
- Both your front and secret piece should be stamped. Take the stamp enamel marker and cover all of the stamped parts you want to fill in with a black outline. Let them dry for about a minute or two and then rub off the excess ink. Repeat again if the dips aren’t dark enough for you.
- With the applicator or a small paint brush, apply a tiny drop of red enamel accent to the heart. Carefully spread it to the edges. Let dry for at least an hour.
- When the heart is dry, you’re ready to assemble! Grab your pliers and open one jump ring. Slide the two finished circle blanks on it. Use your pliers to close the jump ring.
- Open another jump ring, slide on one end of your chain and the lobster clasp. Use your pliers to close your jump ring.
- Slide the other end of the chain through the jump ring that is on the circle blanks.
- Open the last jump ring with your pliers, attach it to the empty end of your chain. Close the jump ring.
- Try on your new necklace!
I love this simple project because it makes such a sweet and intimate gift and it only takes a couple hours to put together! This easy DIY necklace makes a great best friend gift or a special surprise for mom. Really, who doesn’t love a special secret message just for them?
Grab your stamps and some blanks and make some cute necklaces this weekend!

Did you make one of these? We love seeing your projects. Share a photo on our Facebook page!
by Maggie Kmiecik | Aug 15, 2017 | Craft Tutorials
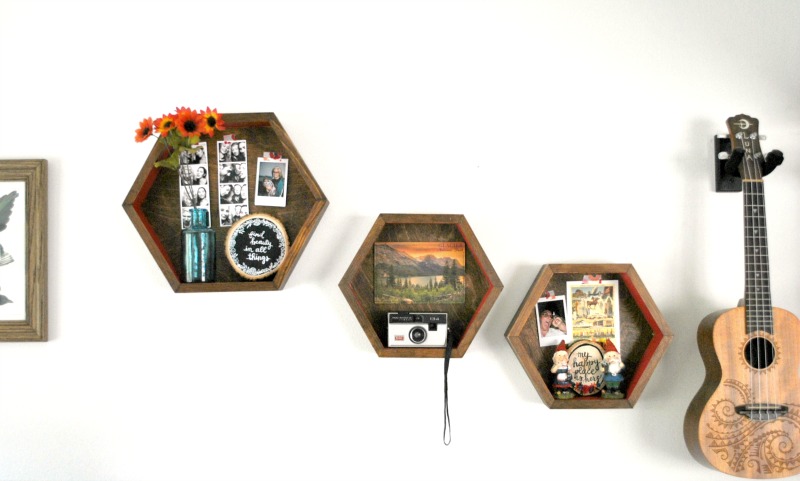
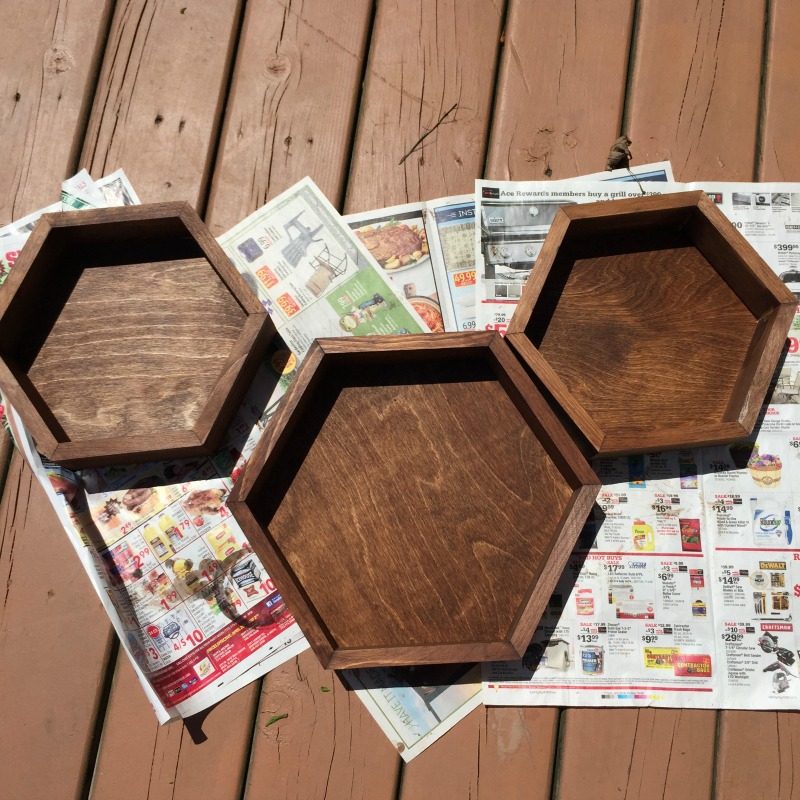
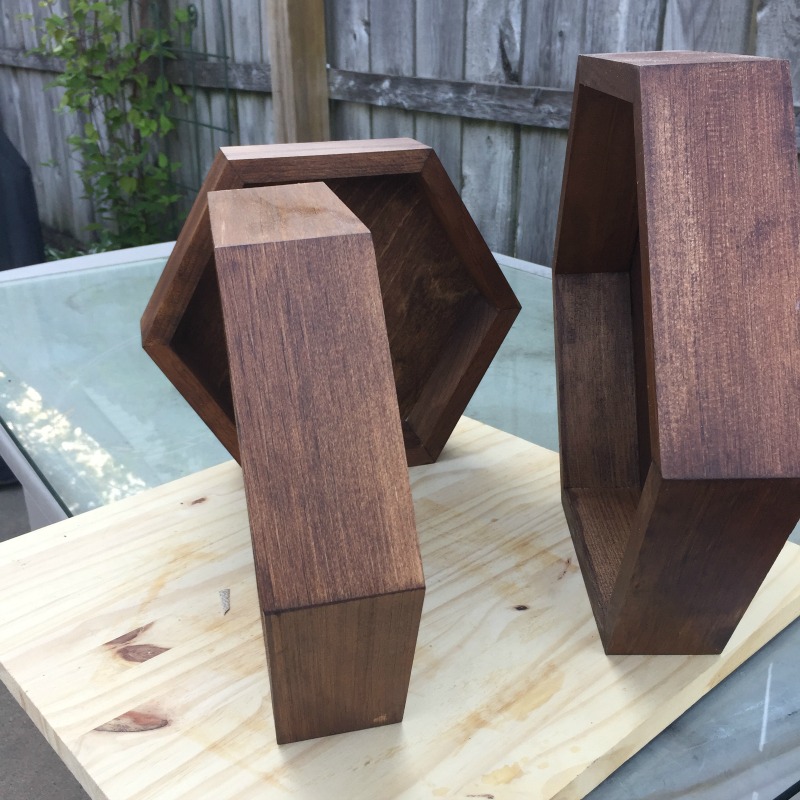
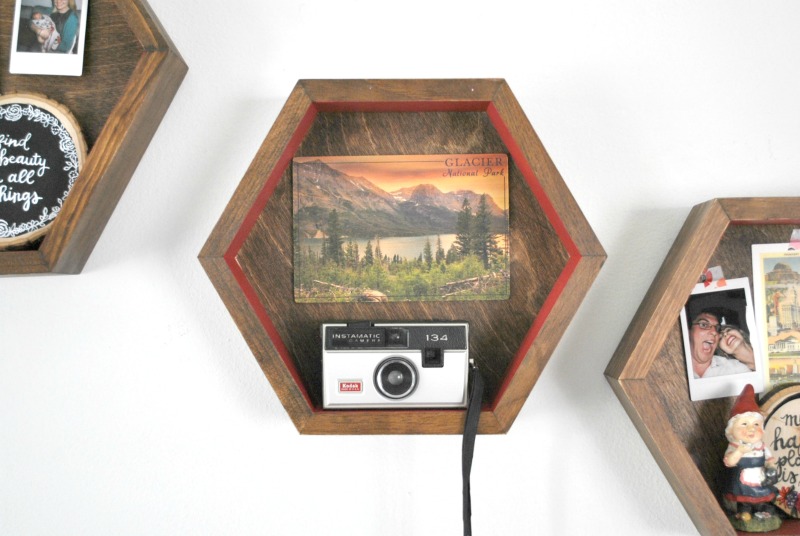
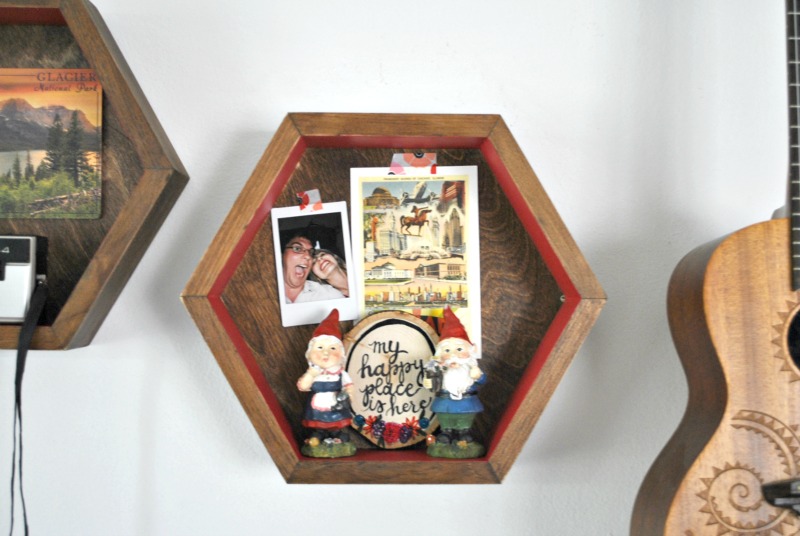
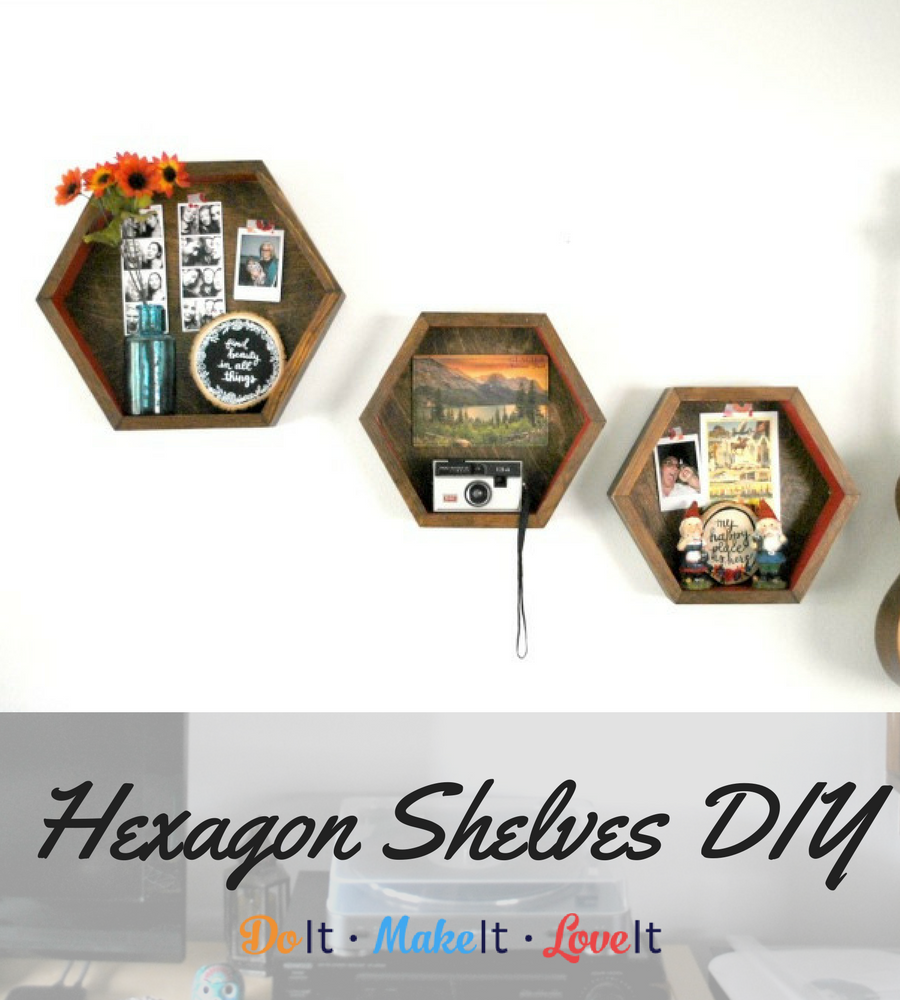
Have you seen the hexagon wall decor trend all over Pinterest too? It got to me big time and all I could think about was making cute little hexagon shelves for my apartment. Since I have a very specific color scheme for my apartment, I really couldn’t find exactly what I had imagined so I decided to make my own hexagon shelves. I found these awesome large and small pine shelves from Walnut Hallow and snagged them up!
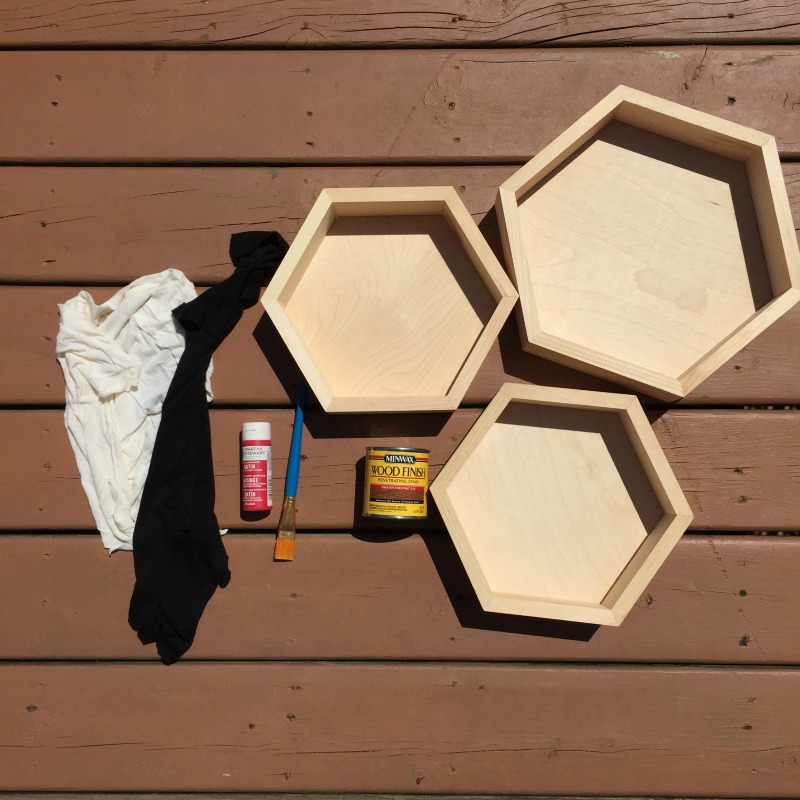
They were exactly what I needed – a blank canvas. I wanted something that was either the right wood color or that I could stain and paint, so these are absolutely perfect. They come slightly sanded but unfinished so they are ready to stain as soon as you get them in your hands. I have to say I am obsessed with this stain color. It took to the pine so well.
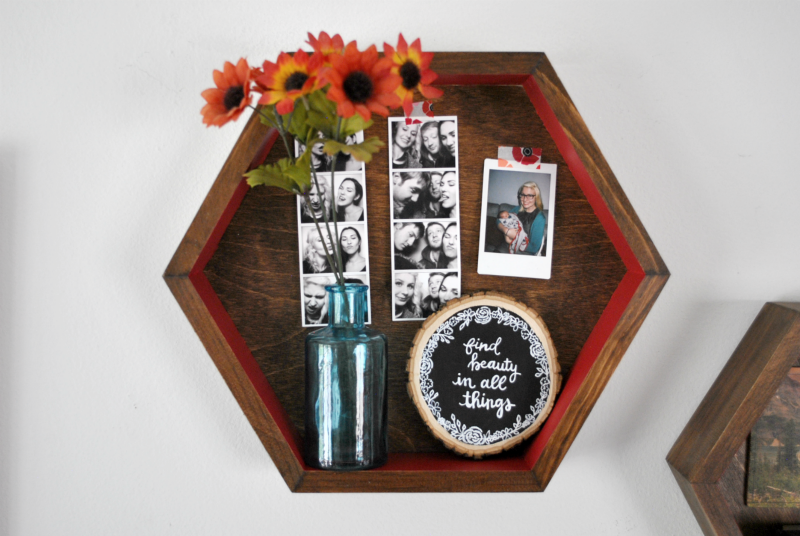
I gave them just a little pop of red on the inside because I didn’t want to the color to be the focus and I love how they turned out!

DIY Hexagon Shelves
Supplies
We’ve included affiliate links throughout this post to make collecting your supplies easy! If you have any questions, please take a look at our disclosure and privacy policy.
Instructions
- Time to stain! Grab your stain and your rags and apply the stain to the hexagons as directed. You can also use a brush for this step if you prefer, but I like using a rag because it means I can wipe off as I go too. It’s handy to have a clean rag even if you are using a brush in case you get too much in one spot.
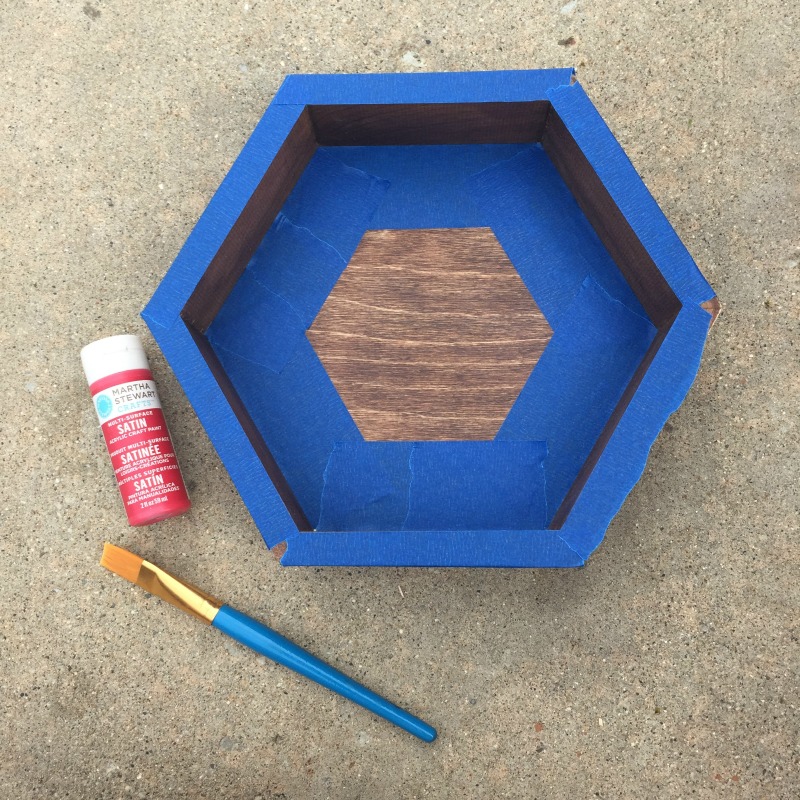
- Let your stain dry overnight and now it’s time to seal. I like the rub on polyurethane, but any sealer will do. Just make sure to avoid sealing the inner edges since we’ll be painting those with craft paint and craft paint doesn’t stick very well to freshly sealed surfaces. Let dry according to your product’s directions.
- Tape up the parts around the edges where you’ll be painting.
- Grab your brush and paint your edges! This is the fun part. You could even tape up some designs on the back panel or paint the front edges if you want the color to pop more.
- Grab the flat piece with teeth from your picture frame hanging kit and hammer it into the very top of your hexagon with the little nails that come in your kit. Make sure you hammer it into the thicker edge and not the thin back.
- Hang up your brand new shelves and have fun decorating!
I collected all my odds and ends and just used a little bit of colorful washi tape to hang up some pictures. I am so happy with the way they turned out.
Did you make your own version? We’d love to see them! You can share them on our Facebook page or tag us on Instagram.
by Maggie Kmiecik | Jun 19, 2017 | Recipes
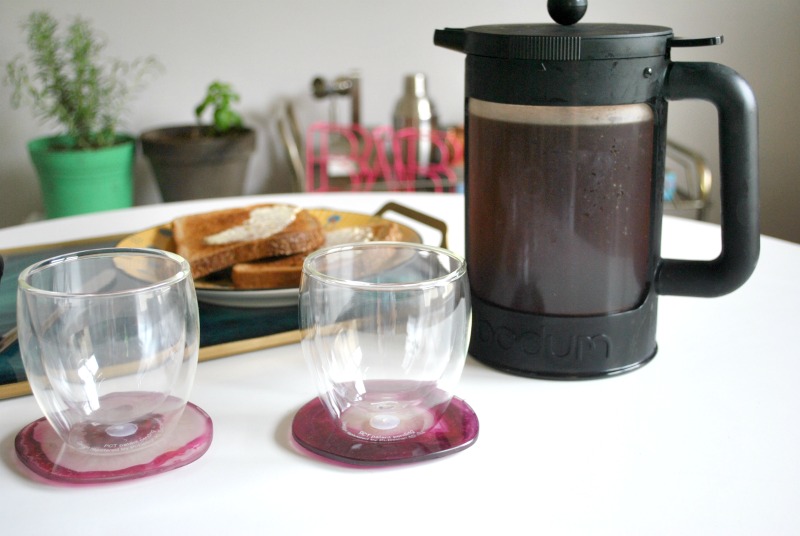
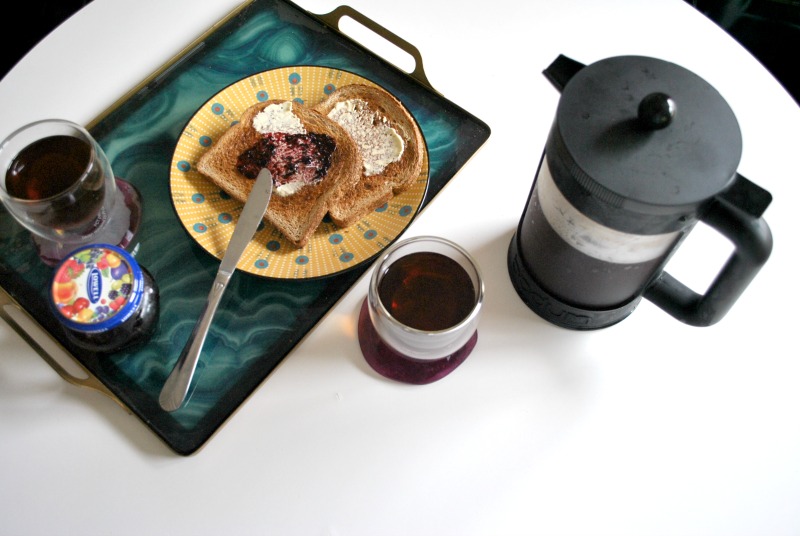
Coffee! We’re all addicted, right? Right?! Summer usually just means switching from your coffee sleeve to a straw, but with the cold brew coffee craze hitting every coffee shop in town it seems everyone’s favorite beverage has some competition.
This post is in partnership with Bodum. We received products and a tutorial in exchange for writing this post. All opinion and reviews are our own. We’ve included links to our favorite products too! If you purchase from these links, we’ll make a little money. Check out our disclosure and privacy policy.
Iced Cofee vs. Cold Brew
So what’s the big deal anyway? Aren’t cold brew and iced coffee the same thing? Well, if you’re asking me that, you’ve obviously never had cold brew. You can tell the difference in the taste! Here’s a little cold brew 101: cold brew is made by steeping coffee ground in cold filtered water. You know, the same way you would make coffee minus the heat. It takes longer to brew, but if you like full flavor and subtle sweetness in your coffee, it’s the way to go.
Iced coffee is made by brewing coffee twice as strong in your favorite traditional method and then cooling it. This gives the coffee a lighter body. Cold brew is brewed overnight (or rather, we prefer to brew it overnight) in cold filtered water, giving it a lower acidy taste and making it smoother. So if you were wondering what makes cold brew coffee better, the answer is the taste! Of course, this is a personal preference though so we’re totally not judging if you’re still an iced coffee drinker.
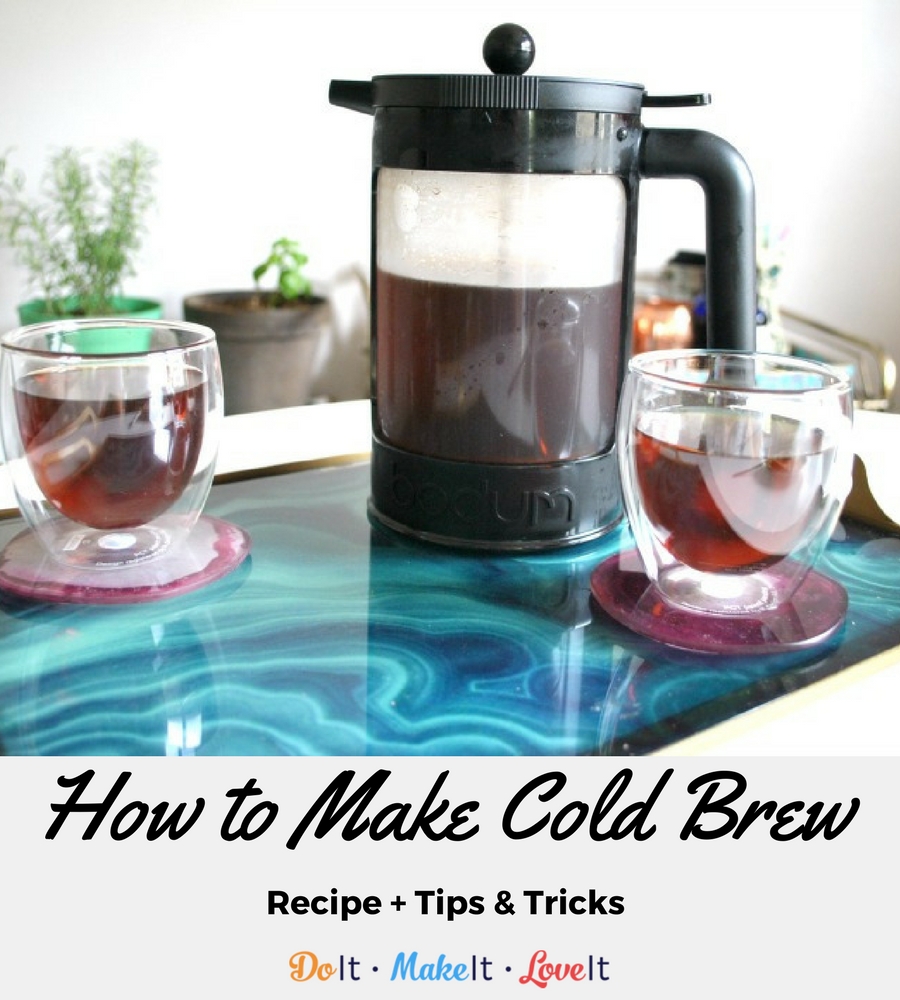
How To Make Cold Brew Coffee
The process for making cold brew took me some trial and error, to be honest, but once I got my recipe down I have not gone back to iced coffee. I might be a tiny bit particular about my coffee. Just a touch. I like to fresh grind my beans every time I make coffee because I really can taste the difference. My favorite coffee grinder for regular daily cups is the Bodum Bistro Electric Blade Grinder because it’s compact and perfect for grinding up just enough for one pot, but you do have to eyeball the grind.
When we partnered with Bodum on a tutorial I was beyond excited to find out that they make a Cold Brew Coffee Maker! My first thought was “my cold brew is going to look so much fancier than pouring it out of a giant mason jar.” Then I realized not only that but it was also going to make my life so much easier.
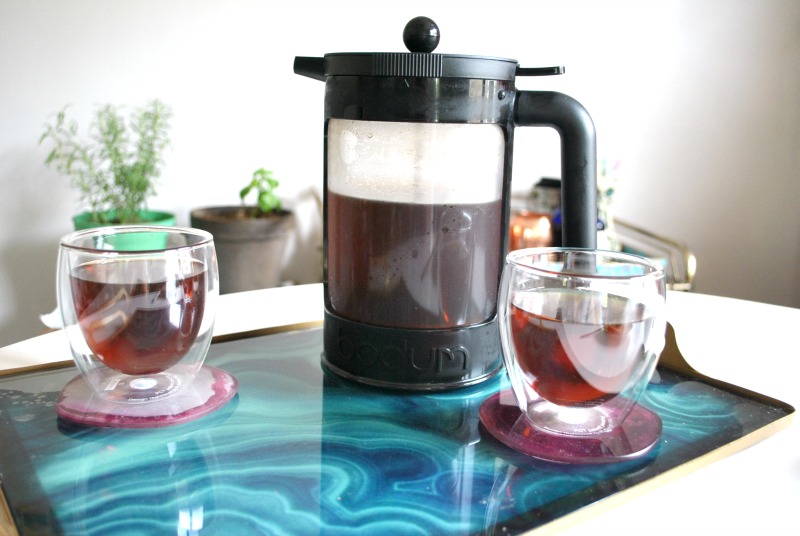
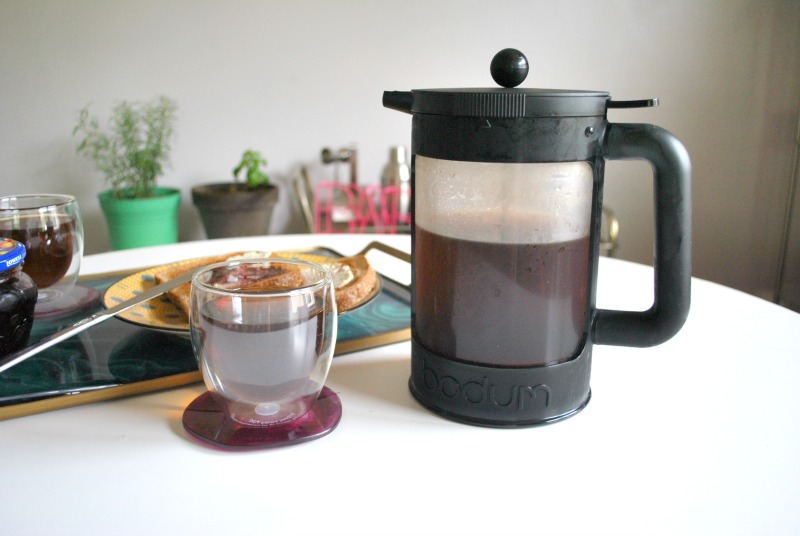
I love my Cold Brew Coffee Maker because it comes with a flat lid so you can pour in your coffee and water and then cover to store in the fridge overnight without the handle of the French Press taking up all the room. Once your coffee is brewed, you just secure on the press top and push down like a regular French Press and it has a handy little pour lock so you don’t accidentally spill coffee all over your fridge (been there too many times).
The below recipe for cold-brewed coffee specifically uses this cold brew coffee maker, which will make your life easier if you love coffee. However, you can definitely repeat these steps with any kind of container. The recipe cold brew recipe below is from Bodum, the coffee masters, so if you follow it carefully, you will definitely have the best tasting cold brew!
How To Make Cold Brew Coffee
WHAT YOU NEED:
- The Bean Cold Brew Coffee-Maker
- Bodum Bistro Burr Grinder
- Fresh filtered water (1300 grams)
- Wooden/plastic stirrer
- Kitchen scale
- Bodum Pavina Double Wall Glass
- Coffee beans – whole (use your favorite beans; light, medium, or dark roast)
- Bodum recommends a medium to dark roast for best result (163 grams)
PREPARATION & EXECUTION:
In order to make delicious tasting cold brew, you’ll need to grind your coffee beans with the correct coarseness. This is KEY. If you’ve ever tried making cold brew with espresso ground coffee, you know what I mean. If you’ve never done that, I do not recommend.
- Cold brew requires a coarse grind, just like your French Press. If you do not have a burr grinder, you can use a blade grinder. A blade grinder will often produce an uneven grind, hence a burr grinder is preferred. If you’re using a blade grinder, grind the coffee until it resembles sea salt.
- We are using a 1:8 coffee to water ratio. What does that mean? It means that for every gram of coffee, we add 8 grams of water. The bean has a total capacity of 51 oz, 1.5 L, or 1500 grams. This water to coffee ratio is two times stronger than normal. Cold brew is best when it is very bold, so it doesn’t get watery when you add ice and milk.
- On your scale, weigh 163 g. of coffee beans. (1300/8 = 162.3). Why 1300? We need to allow space for the coffee beans, and since the total capacity of The Bean is 1500 grams, and the coffee takes up nearly 200 grams, we need to subtract 200 from 1500 for a total 1300.
- Now that you have your coffee measured out, it’s time to grind. On the burr grinder, twist the arrow to the French Press illustration, which is located to the far right. Set the timer to 20 seconds, add the coffee to the hopper (funnel) and press the start button. Keep going until all the beans are ground. You may have to empty the glass container a few times.
- Once you’ve ground all the coffee, transfer it to The Bean. Place The Bean on the scale and tare. Add 1300 grams of water, and stir to ensure all coffee beans are completely saturated. Put on the lid and place in the fridge for 12 hours. Don’t rush this.
PROTIP: Make it when you get home from work, and it will be ready for you in the morning.
- After 12 hours, your cold brew coffee is ready. Remove from fridge and replace the lid with the plunger. Press down.
- Plunging should be easy. Do not use force. If you experience difficulty pressing down, you can remove the plunger lid and give it a gentle stir. You can also raise the plunger a bit and slowly press down.
- Your cold brew is ready to be served. Dilute with water, ice, and/or milk. Since the cold brew is stronger than normal, it is recommended to dilute for optimal taste.
PROTIP: If you’re not happy with the taste of the final product, you’re likely either:
1. Over-extracting – the brew time is too long; or
2. Under-extracting – the brew time is too short (try with 18-24 hours). Experiment with the contact time until you get the right balance for your taste. Every bean is different.
We also got a chance to try out these super sleek Bodum Pavina double walled glasses. I’m sure you’ve seen other double walled glasses like these before, but these are my favorite so far. They are so light and beautifully designed. They keep your cold brew cold and your regular brew hot. Since I got them, I’ve used them for just about everything. There’s no condensation to worry about on those (too) humid Chicago summer days and my cup is never too hot when I’m drinking tea out of them. Big fan over here. Also, the shape and weight make them the perfect stemless wine glass (just saying).
Have more tips to add to this article? Let us know in the comments or on Facebook!
by Maggie Kmiecik | Mar 16, 2017 | Make It
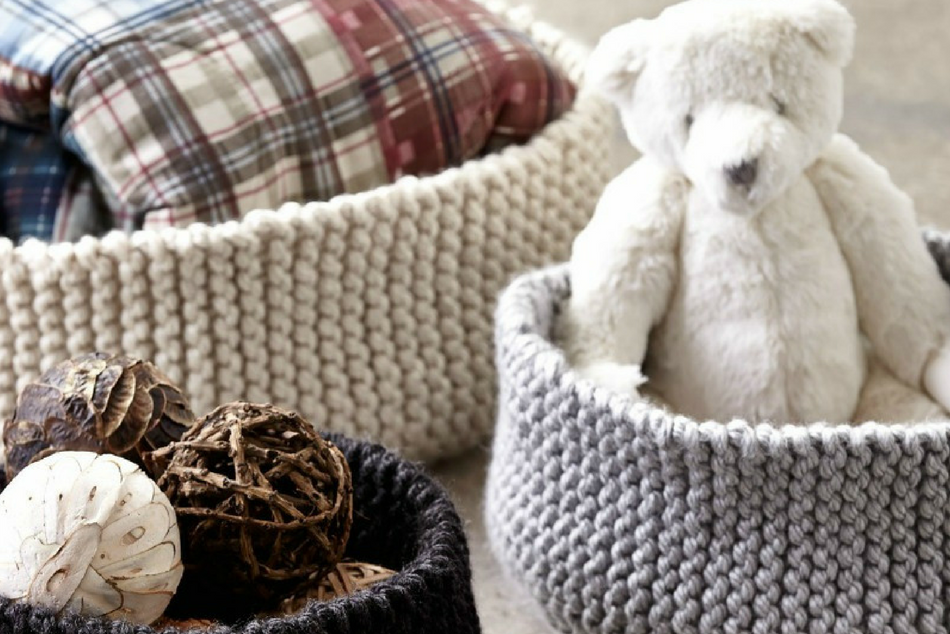
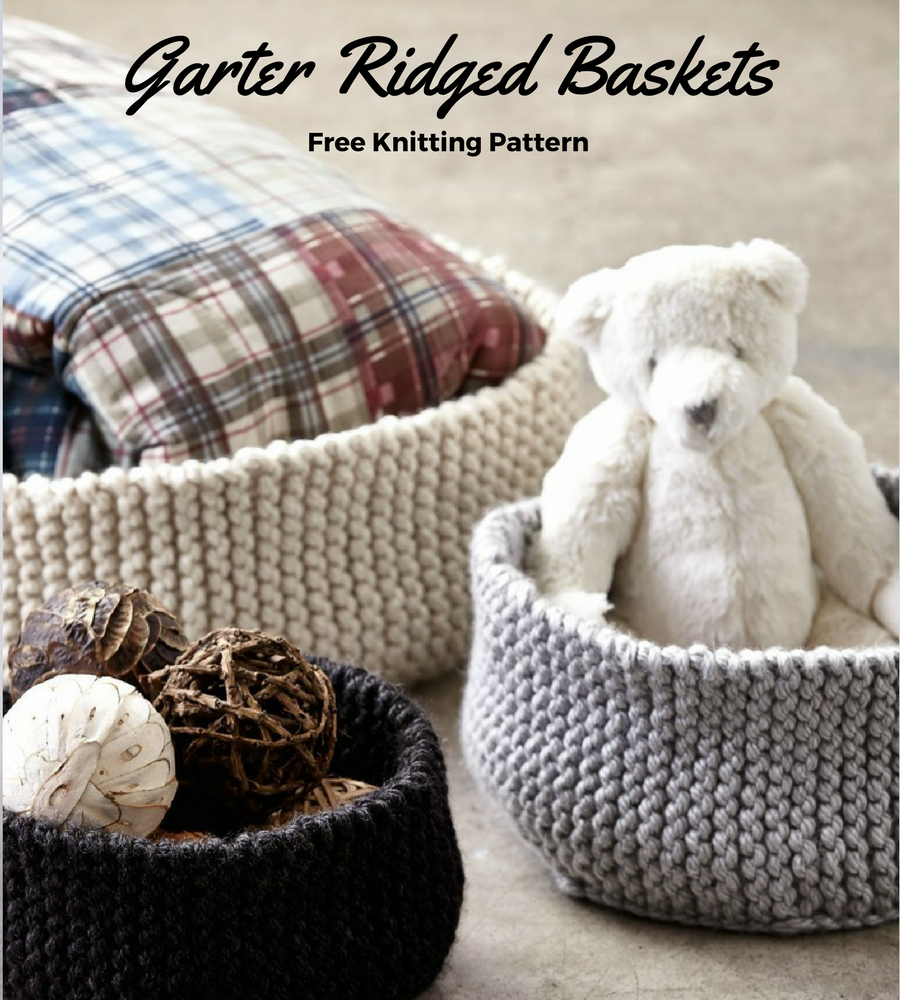
How cute is this knit storage solution? This simple knit basket pattern is so easy to work up, you’ll be able to clear up some clutter quickly! The garter stitch makes gives this pattern a little ridged, cozy look perfect for making a home feel warmer. The pattern comes in a few different sizes so you can make one for all your storage needs around the house. How adorable would a small knit basket be as a centerpiece on your dining room table?
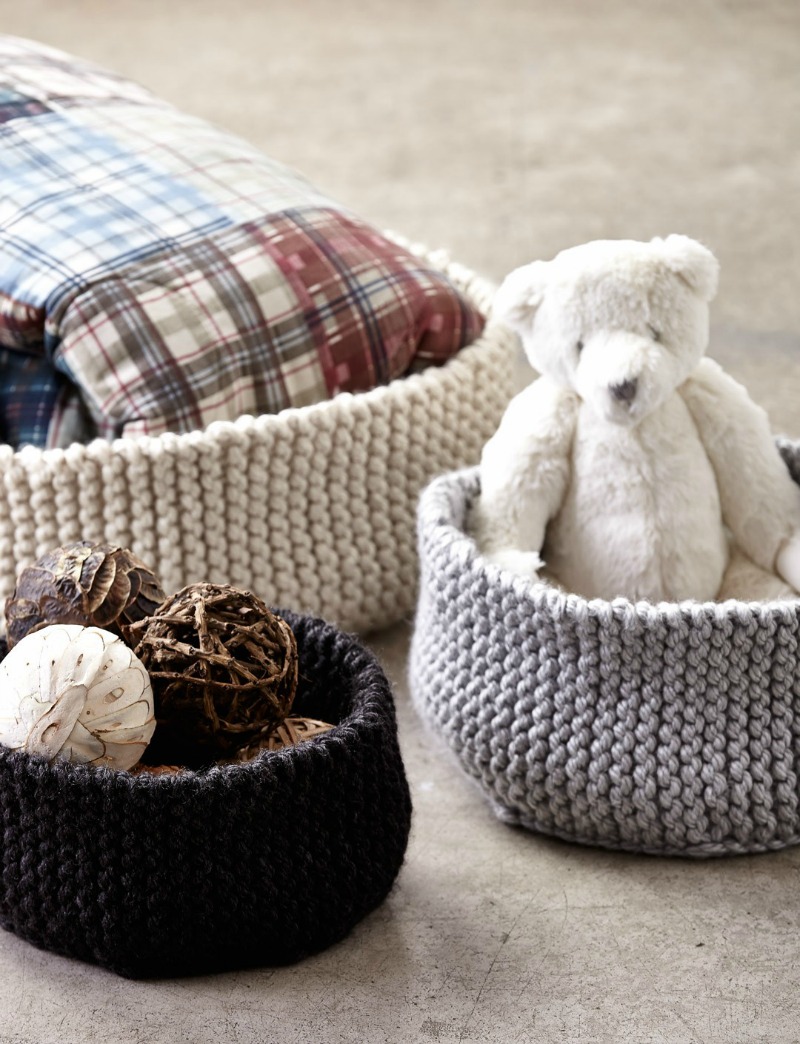
Garter Ridged Knit Basket Pattern
MATERIALS :
Bernat Mega Bulky (10.5 oz/300 g; 64 yds/58 m)
Small:
Dark Grey Heather (88042) 2 balls
Medium:
Light Grey Heather (88046) 3 balls
Large:
Aran (88008) 4 balls
Size U.S. 15 (10 mm) knitting needles or size needed to obtain gauge. Stitch marker.
We’ve rounded up some of our favorite products to make shopping for this project easier for you! You can see our affiliate link privacy and terms here.
by Maggie Kmiecik | Mar 10, 2017 | Make It
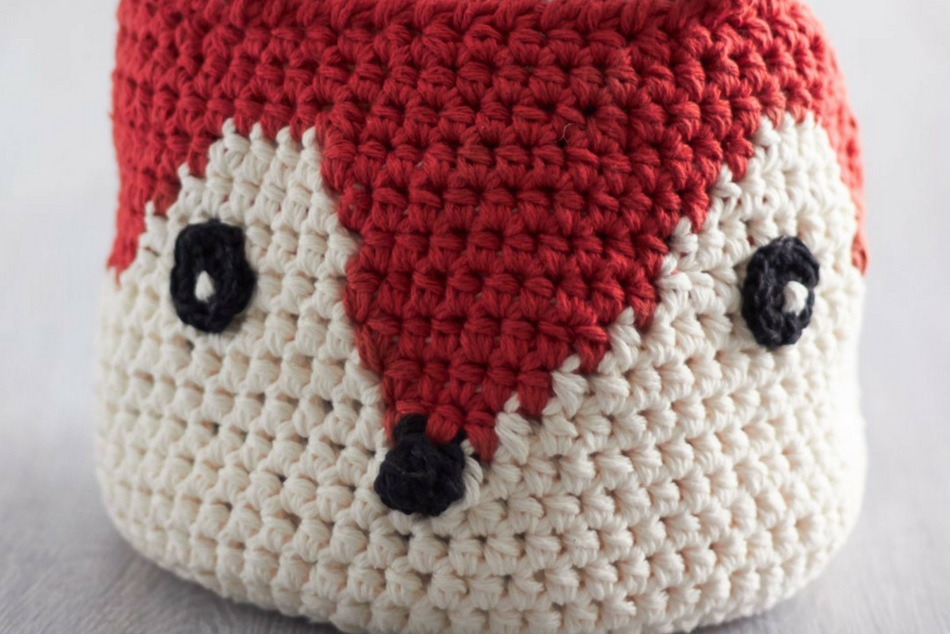
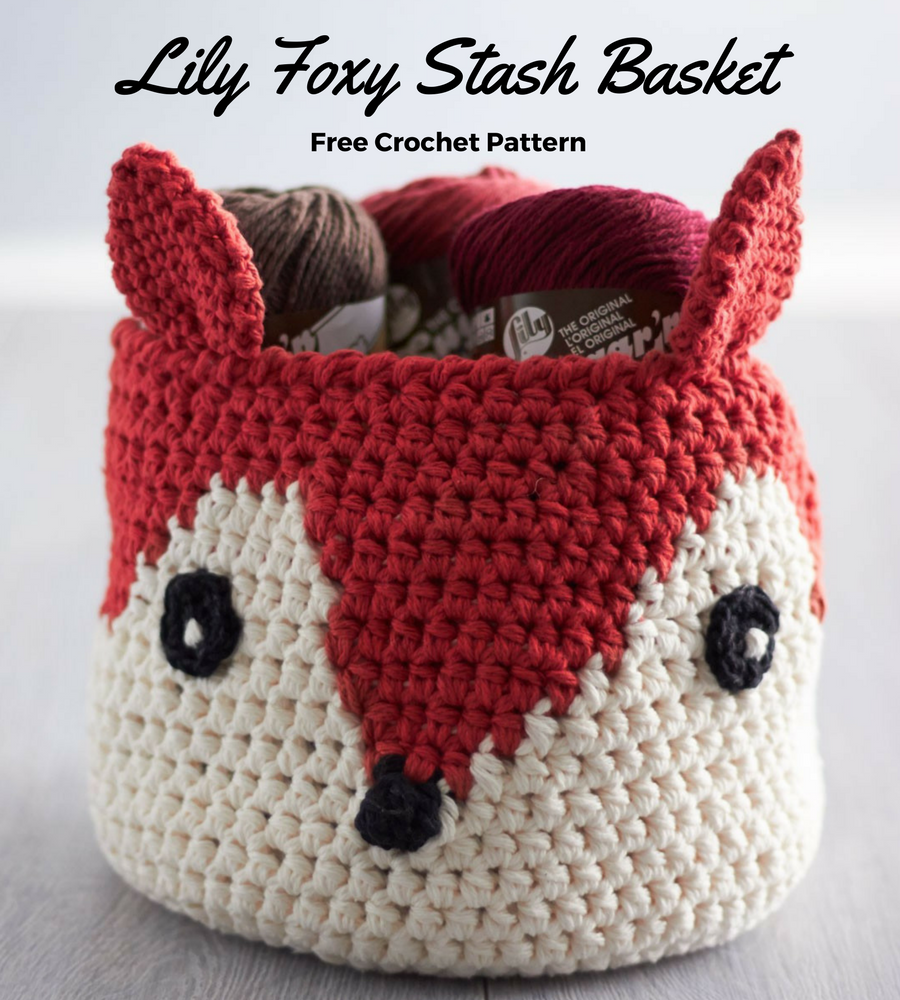
How adorable is this fox basket crochet pattern? I’m obsessed with this cute DIY storage solution. It’s so adorable for an eclectic living room or kids room. This free crochet pattern works up quickly but requires some intermediate skills to complete. Think about the possibilities! Using a different color for the top, this fox can turn into a hedgehog or a raccoon. You can even complete this crochet pattern in shades of brown and make yourself a bear basket! Our heads are spinning with ideas. If you have some advanced crochet skills, you can even make a whole set in different sizes. The download for this pattern only comes in one size, but if you’ve created this same basket in bigger or smaller sizes, let us know in the comments!
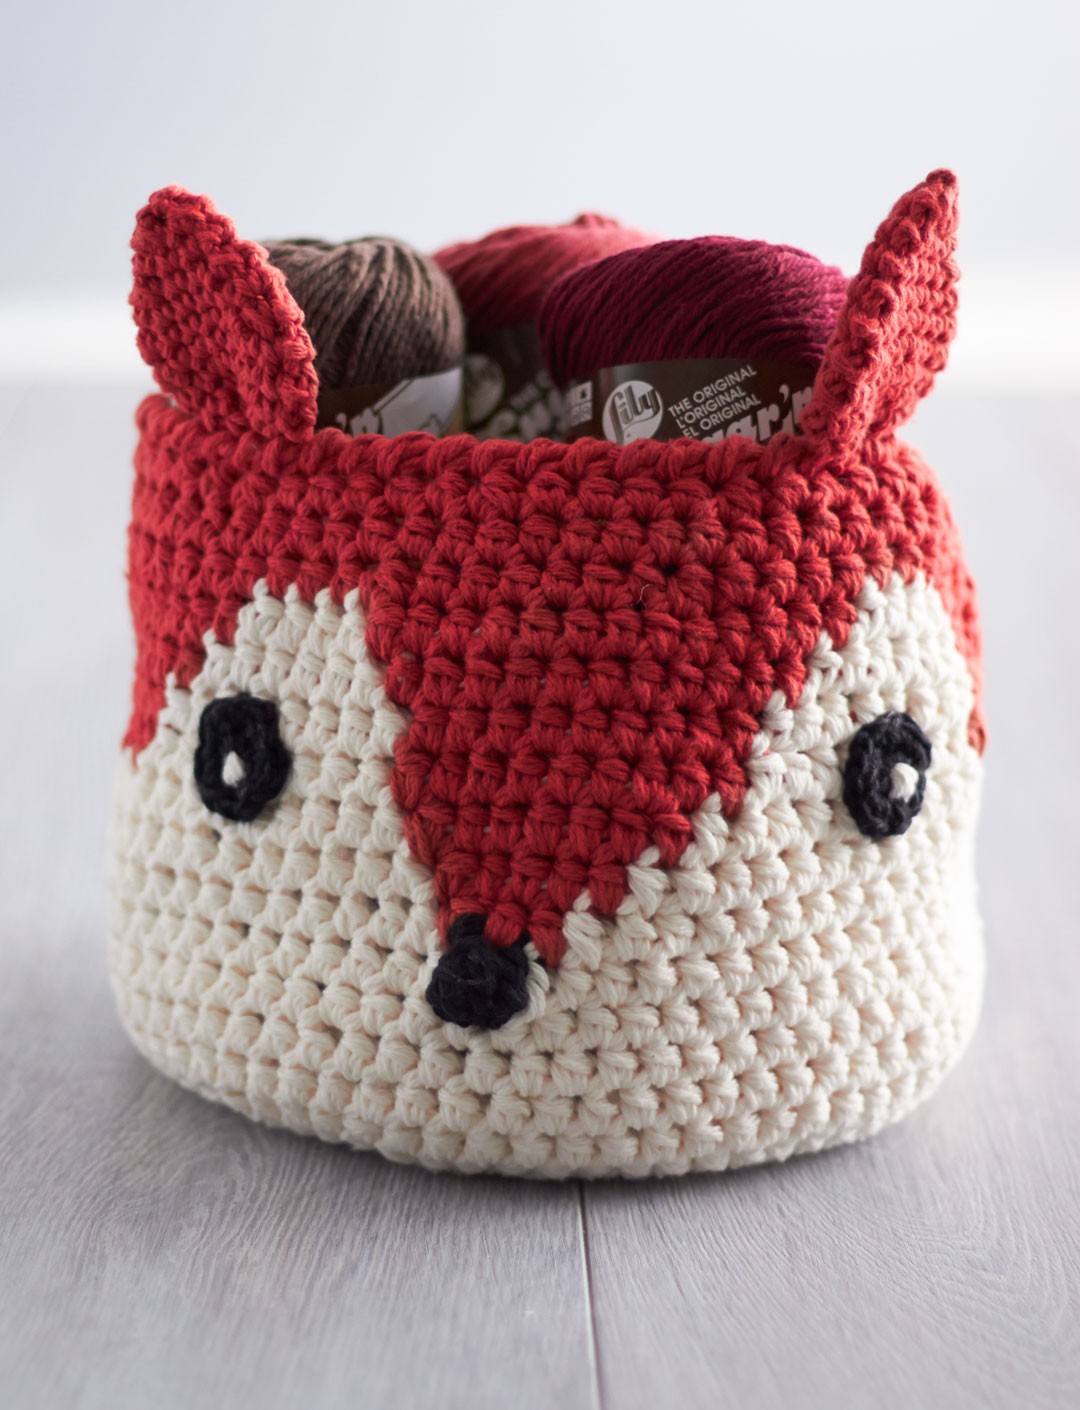
I love working in Lily’s Sugar’n Cream for projects like this because it’s the perfect yarn for home decor projects. It’s stiffer and a little sturdier than apparel yarn, so I always get great results when making dishtowels, coasters, baskets, and other crochet items to use around the house. This pattern can of course also be made up in your yarn of choice as long as it’s the same weight, but I highly recommend checking your gauge if you’re working in a different yarn. Actually, I highly recommend checking your gauge either way because, let’s face it, it’s really helpful in removing frustration down the line.
Get the pattern at the link below and start crocheting some adorable baskets!
Lily® Sugar’n Cream® (2.5 oz/70.9 g; 120 yds/109 m)
- Main Color (MC) Soft Ecru (01004) 2 balls or 192 yds/175 m
- Contrast A Country Red (01530) 2 balls or 180 yds/165 m
- Contrast B Black (00002) 1 ball or 3 yds/3 m
Sizes U.S. G/6 (4 mm) and U.S. J/10 (6 mm) crochet hooks or size needed to obtain gauge.
We’ve rounded up some of our favorite products to make shopping for this project easier for you! You can see our affiliate link privacy and terms here.